Replacing a cord on a Shark vacuum can feel intimidating if you have never done any repairs before. Many people worry they will break their machine or make things worse. But changing a vacuum cord is not as complex as it seems.
With the right guidance and a calm approach, you can save money, avoid professional repair fees, and keep your Shark vacuum working safely. This guide will show you every step, explain important details, and help you avoid common mistakes. By the end, you will know exactly how to replace a cord on a Shark vacuum with confidence.
Why Replace The Cord Yourself?
Cord damage is one of the most frequent problems in Shark vacuums. The cord can get frayed, cut, or even burnt out after years of use. Sometimes, pets chew on it or heavy furniture pinches it. A damaged cord is unsafe—it can cause electrical shocks or even fires.
Even a small cut in the outer insulation puts you at risk, especially if you use the vacuum on damp floors or near pets and children.
Professional repair shops often charge between $60 and $150 for cord replacement. You can buy a replacement cord for less than $20 and do the job yourself. Many Shark vacuums have a similar cord setup, so this guide applies to most models.
For example, the internal wiring and cord entry points are almost identical across the Navigator, Rotator, and Rocket lines, making DIY replacement practical even if you own more than one Shark vacuum.
Replacing the cord is not just about saving money. You also learn more about your vacuum, increase your repair skills, and avoid the stress of waiting for a repair shop. If your vacuum stops working because of a cord issue, you can fix it right away.
You also gain a sense of accomplishment and confidence in doing small home repairs. Many people find they are able to handle other minor appliance problems after learning this skill.
A non-obvious benefit is that you can choose a longer or more flexible cord if you want to improve your vacuum’s usability. Some users upgrade to a 30-foot cord for bigger rooms, which is easier to do during a replacement.
Safety First: Preparing For The Repair
Before starting any repair, safety is critical. Electrical repairs can be risky if you do not follow basic guidelines. Shark vacuums use household voltage, which can be dangerous. Even if the vacuum seems “dead,” a faulty cord can still carry a charge or spark if handled incorrectly.
- Unplug the vacuum: Never work on a plugged-in appliance. Double-check the plug is out of the wall.
- Check for water: Make sure your vacuum and working area are dry. Water and electricity are a dangerous mix.
- Work in a well-lit area: You need to see every detail clearly. Good lighting helps you spot small screws and wire colors.
- Use insulated tools: These protect you from accidental shocks. Metal tools without insulation can transfer electricity.
- Wear gloves: They help prevent cuts and protect from minor shocks. Nitrile gloves are a good choice because they are flexible and offer some protection.
- Keep children and pets away: The repair area should be calm and distraction-free.
Many beginners forget to check for water or use the wrong tools. These small mistakes can lead to injuries. Always double-check before starting. For extra safety, have a small fire extinguisher nearby, especially if you are working in a cluttered space.
Another often-missed tip: avoid wearing jewelry, such as rings or metal bracelets, which could accidentally bridge electrical contacts if you touch wires while working.
Tools And Materials You Will Need
Having the right tools makes the repair faster and easier. Here are the essential items:
- Replacement cord: Match the cord type and length to your Shark model. Do not use old or used cords from other devices.
- Phillips screwdriver: Most Shark vacuums use Phillips screws. A magnetic tip helps to avoid dropping screws inside the vacuum.
- Flathead screwdriver: Useful for prying open panels. Thin blades are best for delicate plastic.
- Wire cutters/strippers: For removing the old cord and preparing the new one. Look for a tool that does both cutting and stripping.
- Needle-nose pliers: Helpful for gripping wires and connectors. They also help retrieve screws from tight spaces.
- Electrical tape: Insulates wire connections. Black tape is standard, but colored tape can help with labeling.
- Multimeter: Checks for continuity and voltage. Even a basic model is very useful.
- Insulated gloves: For extra safety. Rubber or latex gloves add another layer of protection.
- Zip ties: To organize wires inside the vacuum. They prevent loose wires from blocking moving parts.
If you do not have a multimeter, you can still replace the cord, but checking your work with one is strongly recommended. Buying a multimeter costs around $10-$30 and adds safety. Also, having a small tray for screws and parts prevents loss.
A practical example: If you need to remove a stuck screw, a drop of WD-40 or similar lubricant can help, but wipe away any excess before continuing, as oils can damage internal plastic.
Identifying Your Shark Vacuum Model
Shark vacuums come in many models. Cord replacement steps are similar, but there can be small differences. Find your model name and number—it is usually on a sticker under the vacuum or behind the dust bin. The sticker might be dusty, so clean it gently before reading.
Popular models include:
- Shark Navigator Lift-Away
- Shark Rotator
- Shark Rocket
- Shark DuoClean
- Shark Apex
If you cannot find your model number, search the Shark website or look in your user manual. Knowing your model helps you buy the correct cord and follow the right steps. On rare occasions, newer models may have a tamper-resistant screw head, so check in advance if you need a special bit.
Knowing your vacuum’s age also helps. Some older Sharks use heavier, rubber-insulated cords, while newer models use lighter, flexible cords. This can affect how panels come apart and how the cord connects inside.
Buying The Right Replacement Cord
Not every cord fits every Shark vacuum. Using the wrong cord can cause overheating or electrical failure. For example, a cord that is too thin might get warm during use, which is a fire risk.
Key Factors To Consider:
- Cord gauge: Thicker cords carry more power. Most Shark vacuums use 16-gauge or 18-gauge cords. The gauge is printed on the cord itself or listed in the user manual.
- Length: Standard lengths are 25–30 feet. Too short means less reach; too long can be heavy and tangle. Measure your old cord if unsure.
- Plug type: Most Shark vacuums use a two-prong plug. Some newer models use a three-prong. The third prong is for grounding and must be matched exactly.
- Insulation quality: Look for cords labeled as “heavy-duty” or “vacuum-rated.” Cheaper cords may have thin plastic that splits after a few months.
- Color: Usually black, gray, or white. Match your vacuum or choose your preference. While color is less important, it helps keep your vacuum looking neat.
Here’s a comparison of common cord options:
| Feature | 16-gauge Cord | 18-gauge Cord |
|---|---|---|
| Power Capacity | Higher | Lower |
| Flexibility | Stiffer | Softer |
| Weight | Heavier | Lighter |
| Typical Use | Larger vacuums | Small/medium vacuums |
If you are unsure, take your old cord to a hardware store and ask for a match. Some online stores let you search by vacuum model. Amazon and appliance parts sites often have customer reviews—look for positive ratings and check that buyers used the cord for your vacuum model.
A tip many people miss: Check the cord’s temperature rating. If you vacuum in hot areas (like garages), buy a cord rated for higher temperatures.
Step-by-step Guide To Replacing The Cord
Changing a cord involves opening the vacuum, removing the damaged cord, connecting the new cord, and reassembling the vacuum. Here are the steps, explained clearly.
1. Unplug And Prepare The Vacuum
Check that the vacuum is unplugged. Remove any attachments or dust bins. Place the vacuum upside down on a flat surface. This gives you easy access to screws and panels. If your vacuum is heavy, lay a towel underneath to protect the floor and the vacuum.
Remove any visible hair, dust, or debris from the area around the screws. This makes it easier to see and prevents dirt from getting inside during the repair.
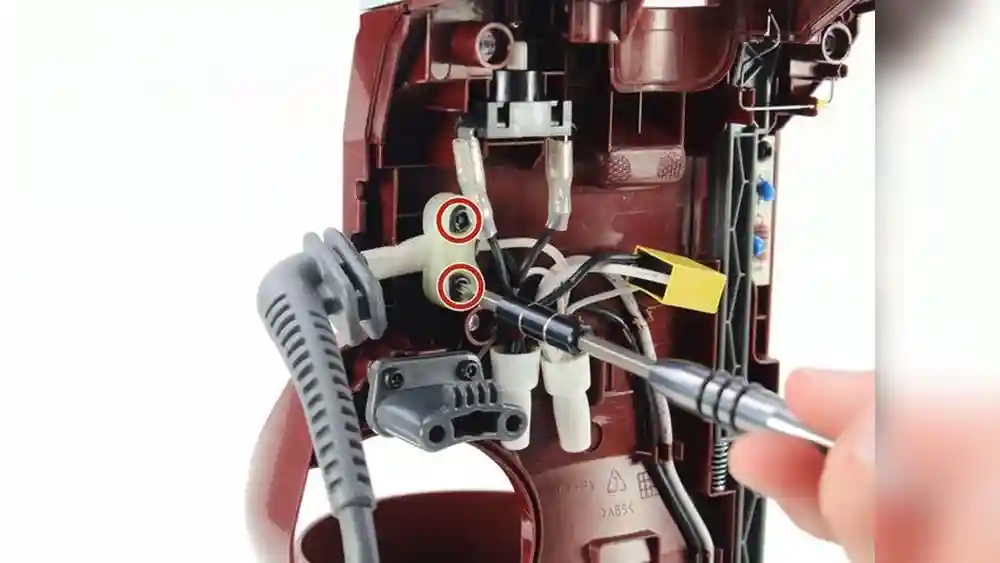
2. Open The Vacuum Body
Most Shark vacuums have screws holding the bottom plate or rear panel. Use a Phillips screwdriver to remove these screws. Keep them safe—losing screws is common. For vacuums with many screws, organize them in a pattern that matches their location for easier reassembly.
Some panels snap into place. Use a flathead screwdriver to carefully pry these open. Do not force panels; gentle pressure prevents cracking the plastic. If a panel is stuck, check for hidden screws under stickers or rubber feet.
Some Shark models have a cord clamp inside the body. Note its position, as you’ll need to reinstall it later.
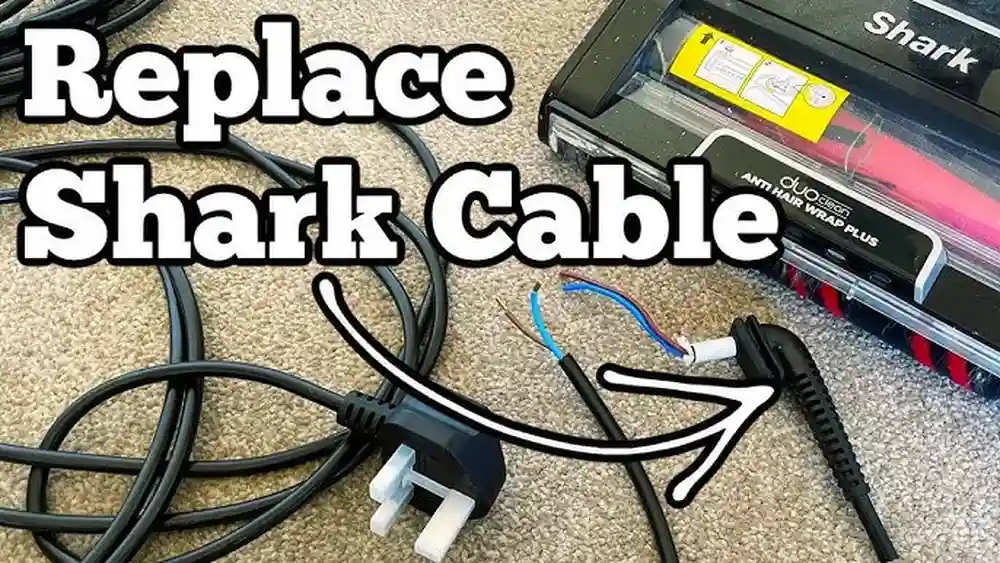
3. Locate The Cord Entry Point
The cord enters the vacuum at the rear or side. Follow the cord inside the vacuum to where it connects to the main wiring. Usually, it connects to a terminal block or wire nuts.
Take photos during each step. This helps you remember wire positions for reassembly. For example, if your vacuum has two black wires and one white wire, label or photograph them to avoid confusion.
If there’s dust or dirt around the wiring, gently vacuum it out with a handheld vacuum or use a small paintbrush to clean the area. This prevents contamination of the new connections.
4. Disconnect The Old Cord
Use needle-nose pliers to remove the cord from the connectors. If wire nuts are used, twist them off. Cut the damaged cord with wire cutters.
Some vacuums use soldered wires. If so, you need a soldering iron to remove the old cord. Most Shark vacuums use screw terminals or wire nuts. If you see a plastic connector, gently pull it apart—do not yank on the wires.
If the cord is held in place by a clamp or bracket, loosen or remove it. Do not discard this part, as it prevents future cord damage.
5. Prepare The New Cord
Strip about 1 inch of insulation from the end of the new cord using wire strippers. You will see two or three wires inside: usually black (hot), white (neutral), and sometimes green (ground).
Twist the exposed copper wires to prevent fraying. If the copper strands are uneven, trim them so all wires are the same length. For extra safety, slide a piece of heat shrink tubing over each wire before connecting (if you plan to use it).
If you are not sure which wire is which, look for small lettering or color markings. On some cords, the ribbed side is neutral and the smooth side is hot.
6. Connect The New Cord
Attach each wire of the new cord to the matching wire or terminal inside the vacuum:
- Black to black
- White to white
- Green to green (if present)
If wire nuts are used, twist the wires together and screw on the wire nut. If there are terminals, loosen the screw, place the wire under it, and tighten.
Wrap electrical tape around each connection for safety. Make sure no copper wire is exposed. If you used heat shrink tubing, slide it over the connection and shrink it with a hair dryer or lighter (do not burn the tubing).
Double-check that the wires are firmly attached. Tug each one gently to make sure it will not pull out.
7. Secure The Cord
Pull the cord gently to check that it is firmly attached. Some vacuums have a clamp or strain relief where the cord enters. This prevents the cord from being pulled out during use.
Replace the strain relief or clamp. If it is broken, use a zip tie to secure the cord. Make sure the zip tie is tight but does not pinch the wire insulation. The goal is to stop the cord from moving, not crush it.
If your vacuum has a rubber grommet at the entry point, check for cracks and replace it if needed. This small part keeps dust out and reduces cord wear.
8. Reassemble The Vacuum
Put the panels and screws back in place. Make sure all parts fit tightly. Do not force screws; cross-threading can damage the plastic.
Double-check that no wires are pinched and that the cord moves freely. If you feel resistance, stop and check for trapped wires.
For extra neatness, bundle excess wire with a zip tie and tuck it into an open space, away from moving parts like wheels or belts.
9. Test The Vacuum
Plug in the vacuum and turn it on. Listen for normal operation. If the vacuum does not start, unplug it and check your connections.
Use a multimeter to check for continuity in the cord and proper voltage. Place the probes on the plug prongs and check that the meter beeps or shows a low resistance. If not, recheck the wiring.
If you notice any sparks, smoke, or a burning smell, unplug the vacuum immediately and inspect the repair.
Practical Tips For Success
Many people make small mistakes when replacing a cord. Here are helpful tips to avoid problems:
- Take clear photos at each step, especially the wire connections.
- Label wires with masking tape if you are unsure.
- Use gentle force when removing panels—Shark vacuums use brittle plastic.
- Always match wire colors exactly.
- Replace broken strain reliefs; do not skip this step.
- Check cord length before connecting—too short or too long affects usability.
- Test with a multimeter before final assembly.
Extra tip: If your vacuum has a cord rewind feature, check the mechanism for wear. Sometimes the cord break happens because the rewind spring is too strong or jams.
Example: Repair On A Shark Navigator
Suppose your Shark Navigator Lift-Away cord is damaged. The cord enters at the rear, connects with wire nuts, and uses a two-prong plug. You buy a 30-foot, 16-gauge cord.
After opening the bottom plate, you find the black and white wires connected with wire nuts. Remove the nuts, strip the new cord, and twist wires together. Replace the wire nuts, tape the connections, and secure the cord with the built-in clamp.
You test the vacuum, and it works. This process takes about 45 minutes for beginners.
Extra insight: If your Shark’s cord failed near the plug, consider buying a cord with a molded plug—these last longer than plugs you attach yourself.
Common Mistakes And How To Avoid Them
Replacing a vacuum cord is simple, but mistakes can cause frustration or damage.
- Mixing up wire colors: Always connect black to black, white to white, and green to green. Double-check before closing the vacuum.
- Leaving exposed copper: Exposed wire can cause shocks. Always cover with electrical tape or heat shrink tubing.
- Losing screws: Place screws in a small container or magnetic tray.
- Forcing panels: Use gentle pressure to avoid cracking the plastic. If something feels stuck, check for hidden fasteners.
- Skipping strain relief: Without strain relief, pulling the cord can break the connection. This is one of the most common causes of repeat failures.
- Wrong cord type: Use the same gauge and plug type as the original. Never use a thinner or ungrounded cord if your vacuum originally had a ground.
Beginners often forget to tape wire nuts or mismatch wire colors. Double-check everything before closing the vacuum.
Another common error: forgetting to check the cord entry grommet. If it is missing or cracked, dust and hair can get inside, causing problems later.

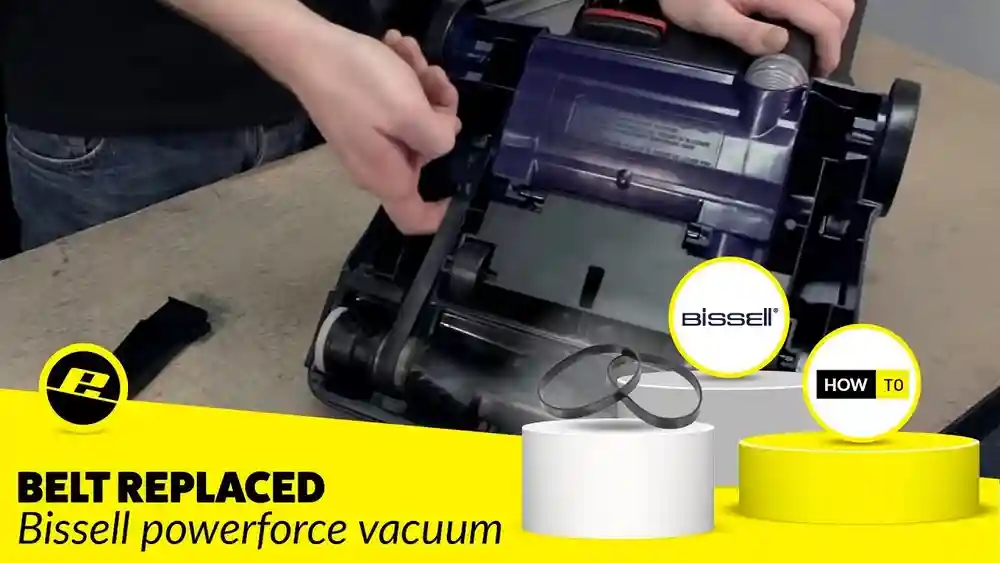
Credit: www.youtube.com
Advanced Tips For Long-term Reliability
If you want your repair to last, consider these advanced tips:
- Use heat shrink tubing instead of electrical tape for connections. It gives a tighter seal and resists peeling off over time.
- Upgrade to a heavy-duty cord if you vacuum often or have pets. These cords resist chewing and wear.
- Add a cord protector at the entry point to prevent future fraying. These are cheap and can be found at hardware stores.
- Clean inside the vacuum before reassembling. A clean vacuum runs cooler and lasts longer.
- Check for other wear and tear—sometimes belts or filters need changing too.
- Apply a small drop of dielectric grease to screw terminals to prevent corrosion, especially in humid climates.
Heat shrink tubing is cheap and adds professional-level safety. Cord protectors prevent bending and pinching.
A less obvious tip: If you have a pet that chews cords, spray the outside of the new cord with a bitter apple spray (pet-safe deterrent). This makes the cord less attractive to pets.
Comparing Professional Repair Vs. Diy Cord Replacement
Many people wonder if they should repair the cord themselves or hire a professional. Here’s a clear comparison:
| Factor | DIY Replacement | Professional Repair |
|---|---|---|
| Cost | $15–$35 | $60–$150 |
| Time | 30–60 minutes | 2–7 days |
| Skill Needed | Basic | None |
| Guarantee | No | Yes |
| Learning | High | None |
| Risk | Low–Medium | Low |
DIY repair saves money and time but requires care. Professional repair is safer if you are unsure, but costs more and takes longer.
Extra insight: Some local repair shops offer a “bring your own part” option, where you provide the cord and they do the labor for less.
Signs You Should Not Attempt Cord Replacement
While most people can replace a cord, there are times when it is safer to seek professional help:
- Heavy smoke or burning smell: Indicates deeper electrical problems, possibly a short circuit or motor failure.
- Damaged internal wiring: If wires inside the vacuum are melted or burnt, there could be other electrical faults.
- Broken panels or screws: If you cannot safely reassemble the vacuum, it may be unsafe to use.
- Unusual plug type: Some Shark vacuums use special plugs or cords that are hard to find or install correctly.
If your vacuum shows any of these signs, contact Shark support or a repair shop. Also, if you feel uncomfortable with any step, do not hesitate to stop and ask for help.
How To Maintain Your Vacuum Cord
Once you replace the cord, taking care of it prevents future damage. Here are practical steps:
- Avoid pulling the cord to unplug—always grip the plug, not the cord.
- Keep the cord away from sharp furniture edges and heat sources, like heaters or radiators.
- Do not wrap the cord too tightly around the vacuum; this stresses the cord and causes it to crack over time.
- Store the vacuum in a dry area to prevent moisture damage and corrosion.
- Check the cord regularly for fraying or cuts. Early repairs prevent bigger problems.
One more tip: If your vacuum has a cord clip, use it. It keeps the cord secure and off the floor, reducing the chance of stepping on or damaging it.
Cord Replacement Frequency And Durability
Most Shark vacuum cords last between 3 to 7 years under normal use. High-traffic homes or commercial settings can wear cords out faster. If you use your vacuum daily or have pets, check the cord more often.
Data shows that:
- Over 60% of vacuum cord failures happen within the first 5 years.
- Homes with pets report cord damage 35% more often than pet-free homes.
- Using a cord protector can extend cord life by up to 50%.
Investing in a quality cord and practicing good habits helps avoid frequent replacements. If you notice repeated cord failures, check that your cord routing and storage habits are not causing extra strain.
Environmental Impact: Repair Vs. Replace
Repairing a vacuum cord is not just about saving money. It also reduces waste. Each year, millions of vacuums are thrown away because of minor cord damage.
By replacing the cord, you:
- Reduce landfill waste.
- Save resources—cords are cheap and easy to recycle.
- Avoid buying a new vacuum, which has a bigger carbon footprint.
If you care about the environment, repairing your Shark vacuum is a smart choice. Even small actions like this help lower your household’s overall waste.

Credit: www.ifixit.com
What To Do With The Old Cord
After replacing the cord, do not throw it in the trash. Most cords contain copper and plastic that can be recycled.
- Take the old cord to a local recycling center. Many cities have e-waste collection points.
- Some hardware stores accept used electrical cords for recycling.
- If you have other old appliances, bundle cords together before recycling.
Copper is valuable and recycling it helps reduce mining and pollution. For creative readers, old cords can be reused for craft projects or garden ties, but remove all electrical plugs first.
Troubleshooting: If Your Vacuum Still Doesn’t Work
If your Shark vacuum does not work after replacing the cord, here are steps to troubleshoot:
- Check all wire connections for tightness—loose wires are a common cause of problems.
- Look for pinched wires under panels.
- Test the cord with a multimeter for continuity.
- Make sure the plug fits tightly in the socket.
- Inspect internal fuses—some vacuums have a small fuse near the motor.
- Check the power switch for damage.
If these steps do not help, the problem might be with the motor or control board. In such cases, professional repair is needed. If the vacuum works but smells or sounds different, unplug it and inspect for miswiring or blocked airflow.

Credit: www.youtube.com
Real-life Success Stories
Many people have shared their experience with Shark vacuum cord replacement.
Example 1: Maria, from Dallas, replaced her Shark Rotator cord after her dog chewed it. She bought a heavy-duty cord, followed an online guide, and finished the repair in 50 minutes. She saved $85 compared to a repair shop.
Example 2: Sam, a college student, repaired his Shark Rocket with a new cord bought from Amazon. He made a mistake by connecting the black wire to the white terminal, but caught it after reading his photos. His vacuum worked perfectly after correction.
Example 3: Lin, a retiree, replaced her Shark DuoClean cord and added a cord protector. She has used the vacuum for two years since the repair with no further issues.
These stories show that beginners can succeed if they follow each step carefully. One thing they all mention: keeping organized and taking photos helped them avoid mistakes.
Comparing Shark Cord Replacement To Other Brands
Shark vacuums are designed for easy cord access compared to some brands. Here’s a comparison:
| Brand | Ease of Cord Replacement | Cost of Cord | Common Issues |
|---|---|---|---|
| Shark | Moderate | $15–$25 | Wire nuts, plastic panels |
| Dyson | Difficult | $25–$40 | Soldered wires |
| Bissell | Easy | $10–$20 | Simple terminals |
| Hoover | Moderate | $15–$35 | Hidden screws |
Shark vacuums use wire nuts and simple panels, making cord replacement easier than Dyson, which often requires soldering.
A less obvious point: Some Dyson and Hoover vacuums have electronic controls inside the handle, which complicates cord replacement. Shark keeps most wiring near the base, making repairs safer and simpler.
The Importance Of Quality Parts
Using cheap or low-quality cords increases risk. Always buy cords from reliable sources.
- Look for UL-listed cords (tested for safety).
- Avoid cords with thin insulation—these wear out quickly.
- If possible, buy original Shark parts.
Cheap cords can overheat, melt, or cause electrical failures. Investing in a good cord is worth the extra few dollars. Also, buying from a reputable seller gives you some recourse if there is a defect.
Where To Find Reliable Repair Guides
If you want extra guidance, there are many resources online. The official Shark website has repair tips, and YouTube has step-by-step videos.
For more detailed information, check this resource:
wikihow: Repair A Vacuum Cleaner
This guide covers general vacuum repairs and includes clear photos for each step. If you prefer learning by watching, look for high-rated YouTube tutorials for your exact Shark model.
Frequently Asked Questions
How Long Does It Take To Replace A Shark Vacuum Cord?
Most people complete the replacement in 30 to 60 minutes. Beginners may need extra time, especially if they take photos and work carefully. If you have to shop for tools or parts, allow for extra time.
Can I Use Any Cord For My Shark Vacuum?
No. You must use a cord that matches the gauge, length, and plug type of your original cord. Using the wrong cord can cause overheating or electrical failure. If in doubt, bring your old cord to the store.
What Should I Do If The Vacuum Still Doesn’t Work After Replacement?
First, check all wire connections and make sure the cord is securely attached. Test the cord with a multimeter for continuity. If everything looks correct, the problem may be inside the motor or control board. At this point, professional help is best.
Is It Safe To Replace The Cord Myself?
Yes, if you follow safety guidelines: unplug the vacuum, use insulated tools, and check your work before plugging it back in. If you feel unsure, ask for help or use a repair shop. Safety always comes first.
Do I Need Special Tools To Replace The Cord?
Most repairs only need screwdrivers, wire cutters, and electrical tape. A multimeter is helpful but not essential. Insulated gloves and zip ties add safety and neatness. If your model uses special screws, a simple set of bits from the hardware store will cover your needs.
Replacing a cord on a Shark vacuum is a practical skill that anyone can learn. With careful steps, good tools, and patience, you can fix your vacuum and avoid costly repairs. Remember, safety and attention to detail are the keys to success.
If you take your time and follow this guide, you will keep your Shark vacuum running smoothly for years to come.