If your Shark RV1001AE robot vacuum isn’t holding a charge or stops working mid-clean, it’s likely time to change its battery. Many owners find this task intimidating, but with the right guidance, it’s a simple maintenance step that can extend your vacuum’s life by years.
Whether your device barely runs for 10 minutes or refuses to power on, replacing the battery is usually the solution. This article will guide you through the process, from preparation to the final test run, using clear, simple language. Along the way, you’ll learn important safety tips, how to avoid common mistakes, and what to do if something goes wrong.
Understanding The Shark Rv1001ae And Its Battery
The Shark RV1001AE is known for its self-emptying base, smart navigation, and reliable cleaning. Like all robot vacuums, it runs on a rechargeable lithium-ion battery. Over time, every battery loses capacity, usually after 1–2 years of regular use. Signs of a weak battery include shorter cleaning cycles, failure to return to base, or no response even after charging.
Knowing how your Shark’s battery works can help you spot problems early. The RV1001AE uses a specific battery model designed for safety and efficiency. Using the wrong type or mishandling the battery can damage the vacuum or cause safety hazards.
Why Change The Battery?
A robot vacuum that loses power quickly is more than an inconvenience. If ignored, a dying battery can damage the robot’s electronics, cause cleaning to stop mid-cycle, or even leave the vacuum stranded in odd places. Here are some reasons to change the battery as soon as you notice issues:
- Restore full runtime: Enjoy complete cleaning cycles again.
- Protect the motor and sensors: A weak battery can cause erratic behavior and stress the internal parts.
- Save money: Replacing the battery is cheaper than buying a new vacuum.
- Reduce downtime: Quick battery replacement means less time without your robot helper.
Tools And Materials You Will Need
Before you start, gather all the tools and supplies. Having everything ready will make the process much smoother and safer.
- Replacement battery: Only use a genuine or high-quality compatible battery for the Shark RV1001AE.
- Small Phillips screwdriver: Most screws on the vacuum’s bottom are Phillips type.
- Soft cloth or towel: To protect the vacuum and your work surface.
- Small bowl or magnetic tray: For holding screws, so you don’t lose them.
- Safety gloves (optional): For extra grip and to avoid static.
- Can of compressed air (optional): For cleaning dust during the process.
Always work in a well-lit, clutter-free area. An organized workspace prevents lost parts and accidental damage.
Safety Precautions Before Starting
Working with batteries always carries some risk. To keep yourself and your device safe, follow these tips:
- Turn off the vacuum and unplug the charging base before starting.
- Avoid static electricity: Touch a metal object or wear an anti-static wrist strap.
- Handle the old battery carefully. Damaged lithium batteries can leak or catch fire.
- Keep small children and pets away while working.
- Do not use metal tools near the battery terminals.
- Dispose of the old battery properly. Many areas have recycling programs for lithium-ion batteries.
Credit: loveyourworktransport.com.au
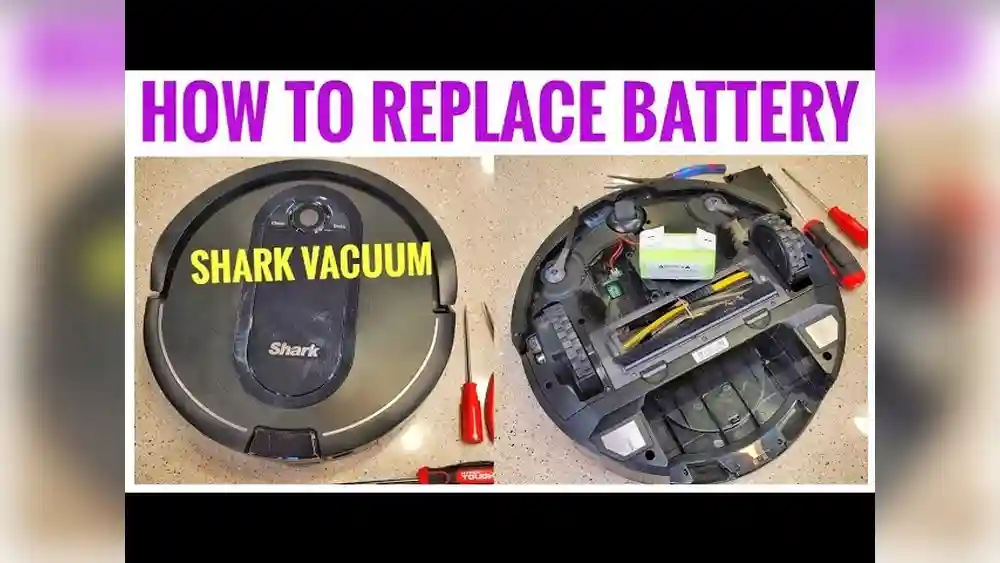
Step-by-step Guide: How To Change The Battery On The Shark Rv1001ae
Step 1: Prepare Your Robot Vacuum
Start by making sure the Shark RV1001AE is turned off. Remove the robot from the charging base. Gently flip the vacuum upside-down and place it on a soft towel to prevent scratches.
Step 2: Locate The Battery Compartment
On the bottom of your robot, you’ll see several screws and panels. The battery compartment is typically marked or located near the center. It has a rectangular cover, often with a battery symbol or model number.
Step 3: Remove The Bottom Cover
Use your Phillips screwdriver to remove all screws securing the battery compartment cover. Place the screws in your small bowl or tray. Lift the cover gently; if it feels stuck, check for any missed screws. Do not use excessive force, as this can crack the plastic.
Step 4: Disconnect And Remove The Old Battery
The battery is attached with a connector—usually a simple plug. Grasp the connector at the base and gently pull it apart. Do not yank the wires or twist the connector. Once disconnected, lift the battery out of the compartment.
If there is dust or debris inside the compartment, use your can of compressed air or a soft cloth to clean it.
Step 5: Install The New Battery
Take your new battery and align it with the connector. Plug it in firmly, making sure it clicks into place. Place the battery gently into the compartment. Double-check that the wires are neatly tucked and not pinched.
Step 6: Reattach The Battery Cover
Replace the compartment cover and secure it with the screws. Tighten each screw until it’s snug, but don’t over-tighten, as this can strip the plastic threads.
Step 7: Test Your Shark Rv1001ae
Flip the vacuum right-side up and place it on its charging base. Allow it to charge fully—usually 3–6 hours for a new battery. Once charged, press the clean button and observe the robot. It should run a full cycle without issues.
If your robot does not power on, double-check the battery connection and make sure the connector is fully seated.
Detailed Walkthrough With Photos And Diagrams
Photos can make the process clearer, but not everyone has access to visual guides. Here’s a detailed description of what you’ll see:
- The battery compartment is a rectangular panel, usually at the bottom center.
- The screws are small and silver; most models have 2–4 holding the compartment cover.
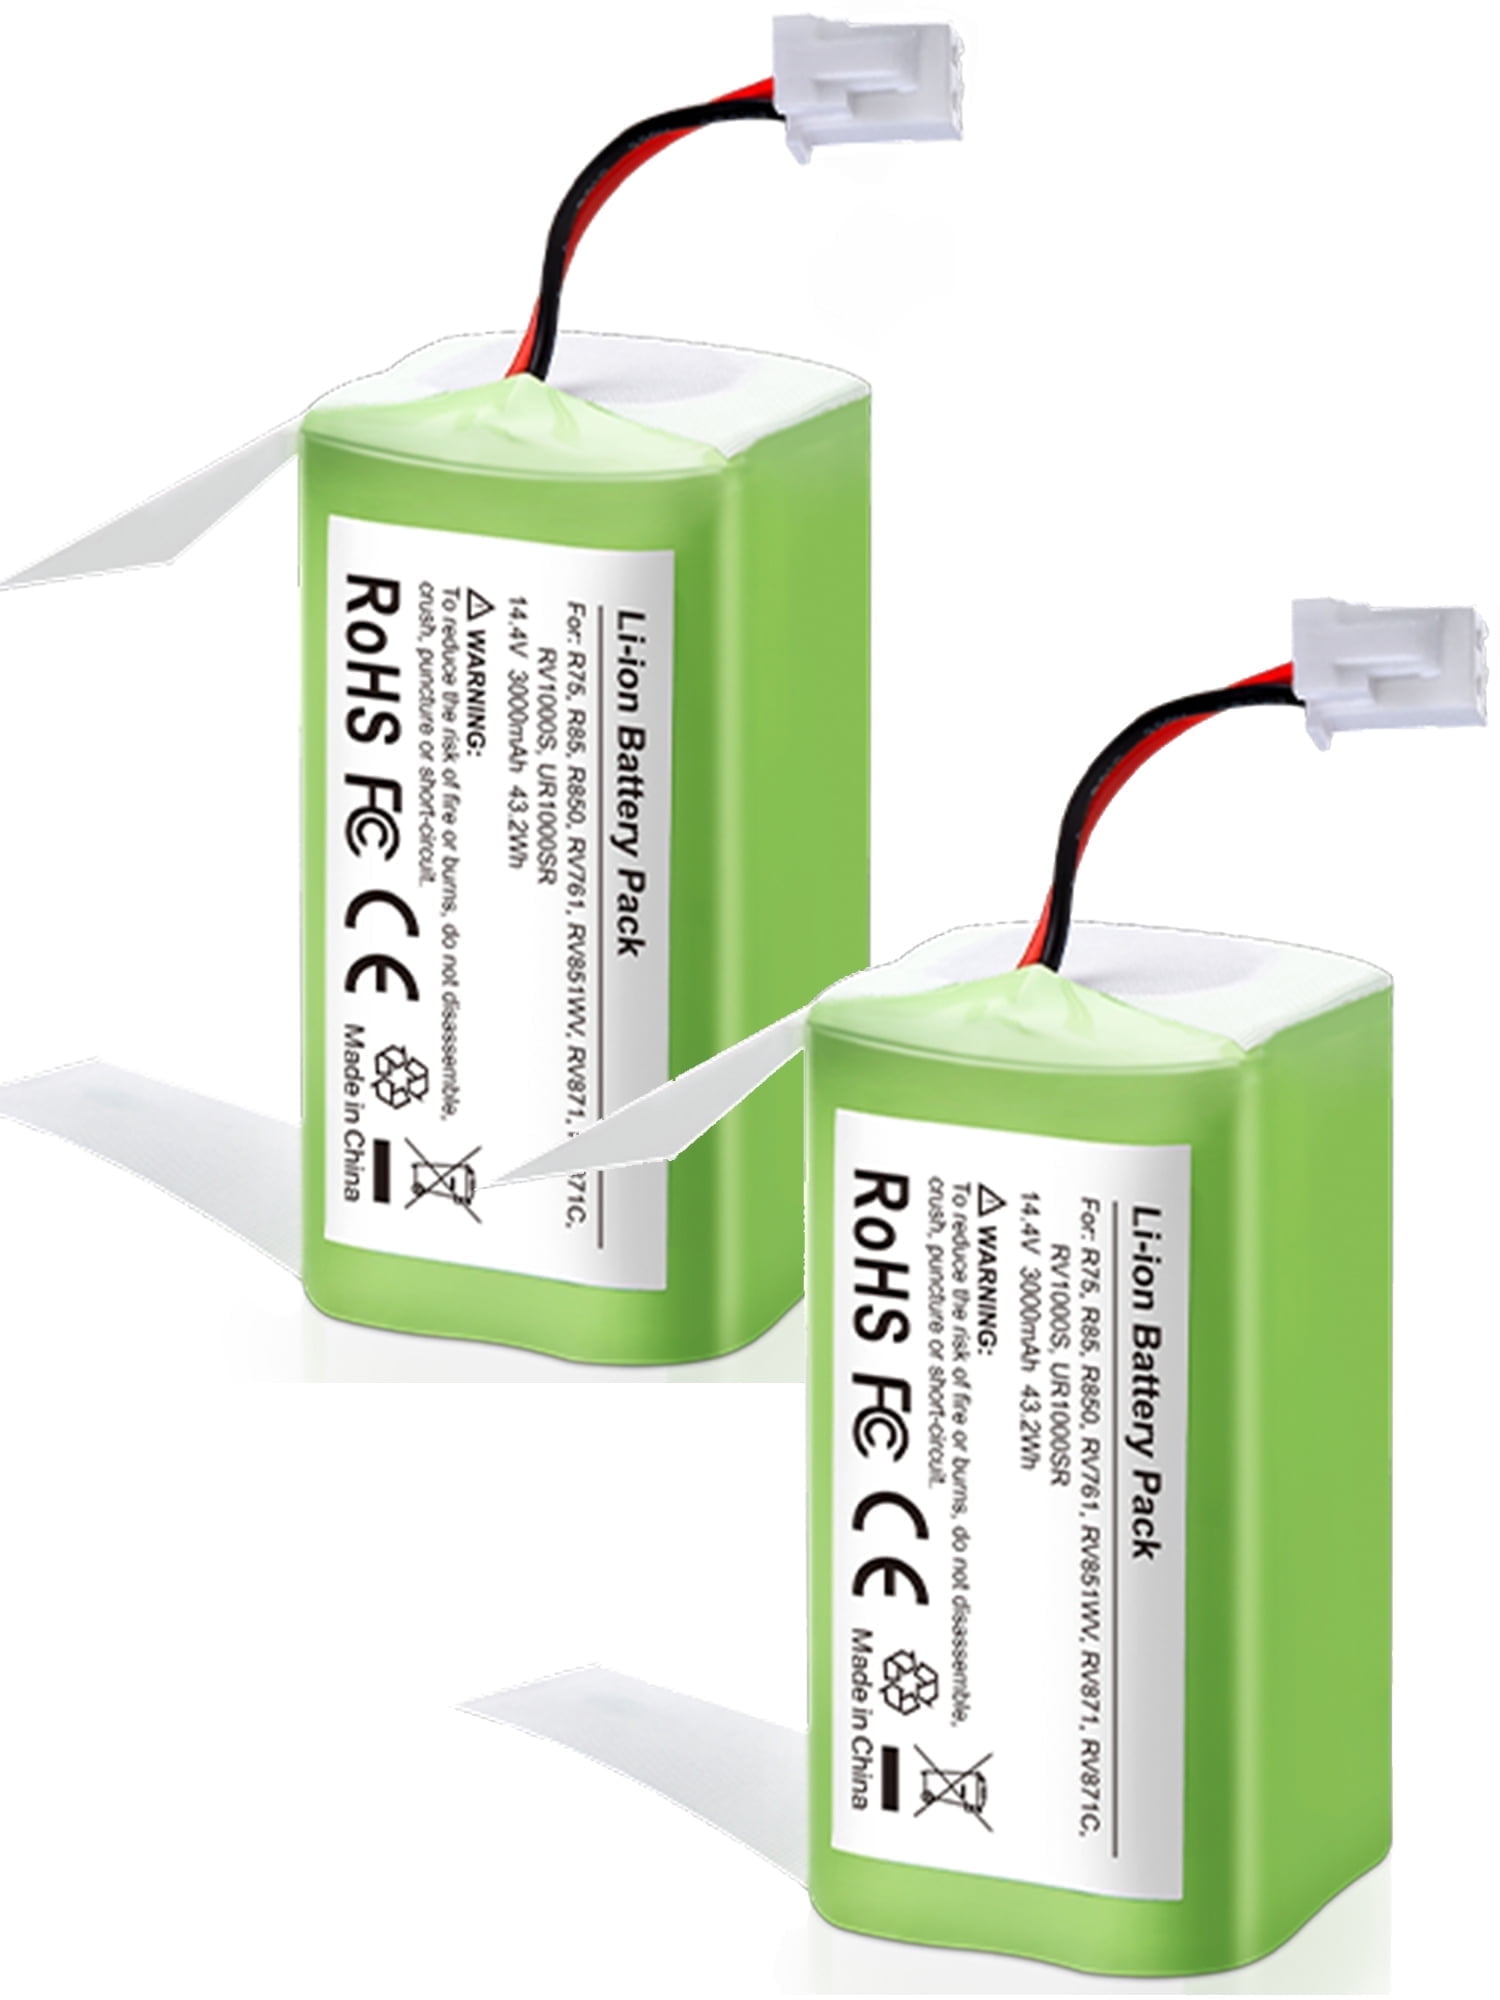
- The battery connector is a white plastic plug, connected to a bundle of colored wires.
- The battery itself is a rectangular block, labeled with voltage and capacity (usually 14.8V, 2600–3000mAh for the RV1001AE).
If you’re unsure about any part, check your user manual or visit the manufacturer’s support page for diagrams. For some users, video tutorials online can also be helpful.
Table: Typical Battery Specs For Shark Rv1001ae
Here’s a comparison of original and common aftermarket replacement batteries:
| Battery Type | Voltage | Capacity (mAh) | Average Run Time | Expected Lifespan |
|---|---|---|---|---|
| Original Shark Battery | 14.8V | 2600 mAh | Up to 90 min | 12-24 months |
| Aftermarket Standard | 14.8V | 2600 mAh | 75-90 min | 12-18 months |
| Aftermarket High-Capacity | 14.8V | 3000 mAh | 90-110 min | 18-24 months |
Choosing a battery with higher capacity can extend your vacuum’s runtime, but always ensure it is compatible with the Shark RV1001AE.
Choosing The Right Replacement Battery
Not all batteries are created equal. Here’s what to look for:
- Compatibility: Only buy batteries made for the RV1001AE. Using the wrong battery can cause errors or damage.
- Capacity: Higher mAh means longer cleaning time, but the battery must fit the compartment.
- Brand reputation: Stick to known brands or highly rated options.
- Warranty: A good replacement battery comes with at least a 6-month warranty.
- Safety features: Look for overcharge, over-discharge, and short-circuit protection.
Table: Battery Buying Checklist
| Feature | Why It Matters |
|---|---|
| Correct Voltage | Prevents circuit damage |
| Right Size | Ensures proper fit |
| Trusted Seller | Reduces risk of faulty battery |
| Customer Reviews | Reveals real-world performance |
| Return Policy | Allows easy replacement if faulty |
Common Mistakes To Avoid
Many people make small errors that can turn a simple battery change into a frustrating task. Here are mistakes to watch out for:
- Forcing the connector: Pull gently from the base, never by the wires.
- Losing screws: Use a bowl or magnetic tray to keep them safe.
- Using a non-compatible battery: Double-check the model and voltage.
- Over-tightening screws: This can crack the plastic or strip threads.
- Skipping the full charge: Charge the new battery completely before first use.
- Ignoring static electricity: Static can damage sensitive parts.
Signs Of A Failing Battery
How do you know if your Shark RV1001AE battery is the problem? Look for these signs:
- Short runtime: The robot stops cleaning after a few minutes.
- Failure to charge: The charging light blinks or stays off.
- Unusual noises: Motors may sound weak or erratic.
- Error messages: The app or device may display battery errors.
- Physical swelling: The battery looks puffy or deformed.
Not all problems are caused by the battery. Sometimes, charging contacts or the charger itself may be faulty. If replacing the battery doesn’t help, check for debris on the charging base or damaged connectors.
Extending The Life Of Your New Battery
A new battery is an investment. Here’s how to make it last longer:
- Keep contacts clean: Wipe the charging pads with a dry cloth every few weeks.
- Avoid deep discharges: Recharge the vacuum before the battery is fully empty.
- Store in a cool, dry place: High heat shortens battery life.
- Use the robot regularly: Batteries last longer when used often.
- Avoid overcharging: Don’t leave the robot plugged in for weeks if not in use.
What To Do If The Vacuum Still Won’t Work
If you’ve changed the battery and your Shark RV1001AE still doesn’t operate:
- Check the battery connection: Make sure it’s firmly plugged in.
- Inspect for damage: Look for bent pins or broken wires.
- Test the charging base: Try plugging it into a different outlet.
- Reset the robot: Some models have a reset button; check your manual.
- Contact support: If the problem persists, reach out to Shark customer service.
It’s rare, but sometimes the issue is with the robot’s mainboard or sensors, not the battery.
Comparison: Diy Vs. Professional Battery Replacement
Is it better to change the battery yourself or hire a professional? Here’s a quick comparison:
| Aspect | DIY Replacement | Professional Service |
|---|---|---|
| Cost | Lower (only battery cost) | Higher (labor + parts) |
| Time | Faster (15–30 min) | Slower (may take days) |
| Skill Needed | Basic tool use | None |
| Risk | Possible mistakes | Very low |
| Warranty Impact | May void warranty* | Usually preserved |
*Always check your device’s warranty status. If it’s still under warranty, a professional replacement might be safer.
Real-world Tips For A Smooth Battery Change
Through years of experience, users and technicians have found small tricks that make the process easier:
- Lay parts out in the order you remove them: This helps you remember the reassembly order.
- Take photos at each step: If you forget where something goes, photos are a lifesaver.
- Inspect the compartment for dust or corrosion: Clean it before installing the new battery.
- Check the battery date: Some batteries have a manufacture date. Avoid installing a battery that’s been sitting unused for years.
- Label your screws: If screws are different sizes, mark them so you don’t mix them up.
These small steps can save you time and prevent mistakes, especially if you’re new to DIY repairs.

Credit: www.amazon.com
Dealing With Old Batteries: Safe Disposal
Lithium-ion batteries must never be thrown in regular trash. They can leak toxic chemicals or start fires in landfills. Here’s what you should do:
- Take the old battery to a recycling center: Most electronics stores or municipal recycling centers accept batteries.
- Store the old battery in a safe place: Use a plastic bag and keep it away from metal objects until you can recycle it.
- Check local laws: Some regions have specific rules for battery disposal.
For more information, visit the U.S. EPA battery recycling guide.
Battery Maintenance Myths: What Not To Believe
There’s a lot of bad advice online. Here are some common myths:
- “You should let the battery go to 0% every time.” Not true for lithium-ion batteries; this can shorten their life.
- “Freezing a battery restores its power.” False. Freezing can damage the battery.
- “Any battery with the same voltage will work.” Wrong—physical size and connector type matter.
- “Third-party batteries are always unsafe.” Some are excellent, but research the brand first.
What To Watch For After Replacing The Battery
For the first few cleaning cycles after a battery change, keep an eye on your vacuum:
- Monitor runtime: It should match or exceed the original performance.
- Check for error lights: If the robot beeps or flashes, consult the manual.
- Watch for overheating: The robot and base should not feel unusually hot.
If you spot any issues, stop using the device and double-check the installation.
Troubleshooting: Common Post-replacement Problems
Occasionally, problems appear after a battery swap. Here’s how to solve them:
- Robot doesn’t start: Check battery connection and charge level.
- Short runtime: The new battery may need 2–3 full charges to reach peak capacity.
- Charging errors: Clean the charging contacts on the robot and base.
- Strange noises: Make sure the battery isn’t loose inside the compartment.
- Error codes: Consult your manual or the manufacturer’s website.
If problems persist, the new battery could be faulty, or there may be another hardware issue.

Credit: www.amazon.com
How Often Should You Change The Battery?
Most Shark RV1001AE batteries last between 12 and 24 months with regular use. Heavy use, high heat, or frequent deep discharges can shorten this time. If you notice performance drops, test the battery before replacing it. Carrying out battery maintenance every 1–2 years is a good rule of thumb.
Cost Considerations: Budgeting For Battery Replacement
The cost of a replacement battery for the Shark RV1001AE ranges from $30 to $70 as of 2024. Original batteries are more expensive but come with a warranty. Aftermarket brands can save you money, but the quality varies.
Factor in the cost of tools if you don’t already own a Phillips screwdriver, as well as your time. If you choose professional service, expect to pay $50–$100 for labor on top of the battery price.
The Value Of Timely Battery Replacement
Delaying battery replacement can lead to:
- Increased frustration: The robot fails to finish cleaning jobs.
- Possible damage: Weak batteries can cause the robot to malfunction.
- Higher costs: If left too long, you may need professional repair or a new vacuum.
Replacing the battery as soon as you spot issues keeps your Shark RV1001AE running smoothly and protects your investment.
Frequently Asked Questions
What Signs Show That My Shark Rv1001ae Battery Needs Replacement?
Common signs include shorter cleaning times, the robot not charging fully, sudden stops during cleaning, or the device refusing to turn on even when the charger is connected. If your vacuum used to run for an hour and now lasts only 10–15 minutes, it’s likely time for a new battery.
Can I Use Any 14.8v Lithium-ion Battery For My Shark Rv1001ae?
No. While the voltage is important, you must also match the physical size, connector type, and internal wiring of the battery. Using the wrong battery can damage your vacuum or cause safety risks. Always choose a battery specifically designed for the Shark RV1001AE.
How Long Does It Take To Change The Battery?
For most people, 15–30 minutes is enough. If it’s your first time, go slowly and keep track of screws and connectors. Having the right tools and preparing your workspace in advance makes the process faster and safer.
Will Changing The Battery Erase My Robot’s Settings Or Wi-fi Connection?
Usually, no. The Shark RV1001AE stores its settings and Wi-Fi information in non-volatile memory, so they won’t be lost during a battery change. However, if you keep the battery disconnected for a long time, you may need to reset the clock or scheduled cleaning times.
Where Can I Buy A Replacement Battery For The Shark Rv1001ae?
You can purchase batteries from Shark’s official website, major online retailers like Amazon, or electronics stores. Always check customer reviews and choose a reputable seller. Be cautious with extremely cheap batteries, as they may be low quality.
Replacing the battery on your Shark RV1001AE is a simple and effective way to restore its cleaning power. With the right preparation, attention to detail, and a few basic tools, you can complete the task in under an hour. By following these steps, choosing a quality battery, and maintaining your device, your robot vacuum will keep your floors spotless for years to come.