Keeping your home clean is a challenge, especially with pets. Pet hair, dander, and dirt can quickly fill up your vacuum, making it work harder and less effectively. If you own a Shark Pet Vacuum, you already know how powerful it is for tackling pet messes. But even the best vacuums need regular cleaning to stay at their best. If you don’t clean your Shark Pet Vacuum the right way, it can lose suction, smell bad, or even break down early. Many pet owners don’t realize that a dirty vacuum can actually spread dust and allergens back into your home.
In this guide, you’ll learn every step to clean your Shark Pet Vacuum, inside and out. You’ll discover how to take it apart safely, which parts to wash, and how to put it back together. You’ll also find practical tips that most beginners miss, so you can avoid common mistakes and keep your vacuum working like new.
By following these steps, you’ll save money, breathe cleaner air, and make your cleaning routine much easier.
Understanding Your Shark Pet Vacuum
Before you start, it helps to know your vacuum’s design. Shark makes several pet vacuum models: upright, stick, and handheld. Most share the same main parts:
- Dust cup or canister – holds the dirt and pet hair
- Filters – trap fine dust and allergens
- Brush roll – picks up hair and debris from carpets and floors
- Hose and attachments – let you clean stairs, furniture, and tight spaces
Some models have special features like self-cleaning brush rolls or anti-allergen seals. These features help reduce the amount of maintenance needed, but they still require regular attention. For example, self-cleaning brush rolls can remove some hair, but longer strands might wrap around the edges and need manual removal. Anti-allergen seals help keep dust contained, but if the seal gets dirty or damaged, allergens can escape.
Understanding the way your vacuum is put together will help you avoid damaging parts when cleaning. Upright models usually have a larger dust cup and more powerful suction, making them better for big homes and heavy pet shedding. Stick models are lighter and easier to move, while handheld models are great for cleaning pet beds or car seats.
Each model may have slight differences in how you remove the dust cup or access the filters.
Always check your vacuum’s manual if you’re not sure how to remove a part. Manuals often include diagrams showing how parts fit together. You can often find a digital copy on the Shark website, which is useful if you lost your original manual or want to check instructions for a new model.
Why Cleaning Matters
A clean vacuum does more than just look good. It:
- Keeps suction strong – Less blockage means your vacuum picks up more dirt. Clogged filters or hoses can reduce suction by half or more, making cleaning harder and less effective.
- Reduces bad smells – Pet hair and dust can stink if left in the machine. Odors can come from bacteria or mold growing in damp dirt or hair.
- Prevents motor damage – Clogged parts make the motor work harder and wear out. Motors that overheat may stop working or need expensive repairs.
- Protects your air quality – Clean filters stop dust and allergens from escaping. Dirty filters can let fine particles back into your home, which is bad for people with allergies or asthma.
- Saves money – Regular care means fewer repairs and replacements. You can avoid buying new filters or parts by keeping them clean and in good condition.
Experts suggest cleaning your Shark Pet Vacuum at least every 1-2 months if you have pets, or more often with heavy use. If you have multiple pets or long-haired animals, you may need to clean every few weeks. Homes with children or people with allergies may also benefit from more frequent cleaning.
Many people underestimate how quickly pet hair and dust build up. Even after one cleaning session, a full dust cup or clogged filter can make your vacuum work harder, leading to higher energy use and more wear on parts. Taking time to clean your vacuum often pays off in less effort and better results.
Safety First: Preparing To Clean
Safety is key when cleaning any electrical appliance. Here’s what you must do before starting:
- Unplug the vacuum. Never clean while it’s plugged in. Electricity and water are dangerous together, so unplugging is essential.
- Let it cool down. If you just finished vacuuming, wait at least 30 minutes. Motors and other parts can get hot and may burn your hands.
- Work in a ventilated area. If possible, clean outside or in a garage to avoid spreading dust indoors. This is especially important if you have allergies or sensitive lungs.
- Wear gloves and a mask. Especially if you have allergies or are sensitive to dust. Gloves protect your hands from sharp edges and dirty parts, while a mask keeps dust and allergens out of your nose and mouth.
Pets can shed fur and dander that stick to vacuum parts, so protecting yourself from exposure is wise. If you’re cleaning after vacuuming up wet messes (like spilled water or pet accidents), be extra careful, as bacteria may be present.
Tools And Supplies You’ll Need
Gather these supplies for a thorough clean:
- Soft brush (an old toothbrush works well)
- Microfiber cloths or paper towels
- Mild dish soap
- Warm water
- Scissors or seam ripper (for hair in the brush roll)
- Small screwdriver (if your model needs one to open)
- Replacement filters (optional, but useful if yours are very dirty)
- A bowl or bucket
Some pet owners also like to use a can of compressed air to blow dust out of hard-to-reach areas. Compressed air is especially helpful for cleaning vents, crevices, and inside motor housings where dust can build up.
For tough stains or sticky messes (like spilled food or sticky pet hair), you might add a small amount of vinegar to your cleaning water. Vinegar helps cut through grease and neutralizes odors, but always rinse thoroughly to avoid leaving a strong smell.
If you clean your vacuum in a garage or outside, bring a towel or mat to protect surfaces and catch falling dirt. This keeps your cleaning area tidy and makes cleanup easier.

Credit: www.youtube.com
Step-by-step: How To Clean A Shark Pet Vacuum
Every part of your vacuum needs attention. Let’s break it down so you don’t miss anything.
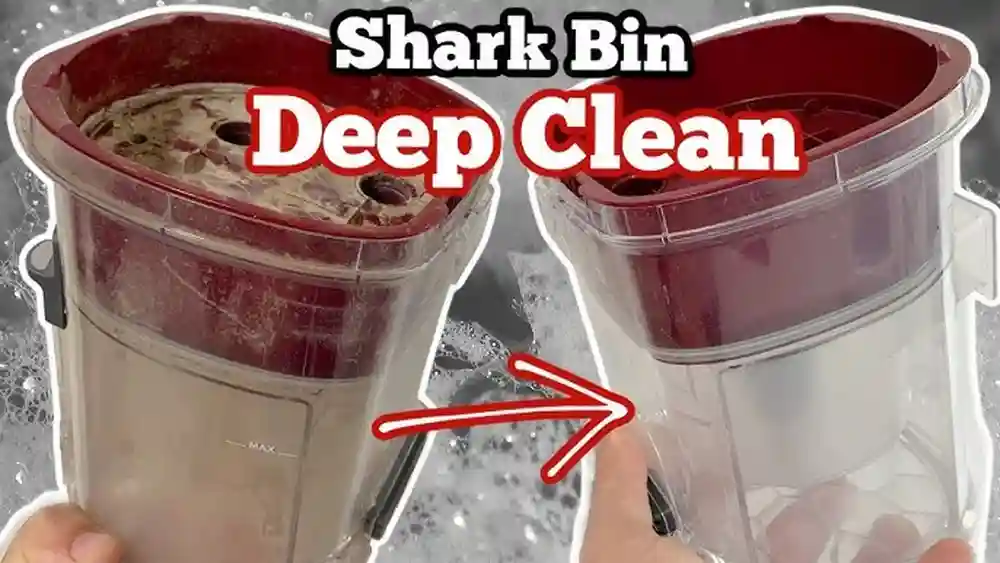
1. Empty The Dust Cup Or Canister
This is where most pet hair and dirt collect. To clean:
- Press the release button to remove the dust cup.
- Hold it over a trash bag and press the bottom latch to empty.
- Tap gently to shake out all debris.
- If hair or dirt is stuck, use a brush or your hand (with gloves).
- Wash the dust cup with warm, soapy water.
- Rinse and dry completely before reattaching.
Insight: Even small clumps left inside can grow mold or bacteria, causing odors. For stubborn dirt stuck to the sides, try soaking the dust cup in warm water for 10 minutes. This loosens dried debris and makes it easier to clean.
If your vacuum has a dust cup with a filter inside, remove the filter before washing. Some models have a removable separator—wash this part too. After washing, double-check that all pieces are dry. A wet dust cup can cause dirt to stick and lead to bad smells.
Many beginners miss cleaning the edges and corners of the dust cup. Use a toothbrush to scrub these spots, as dirt often collects there. If your dust cup has a rubber seal, inspect it for cracks or wear. Replace the seal if it is damaged, as leaks can reduce suction.
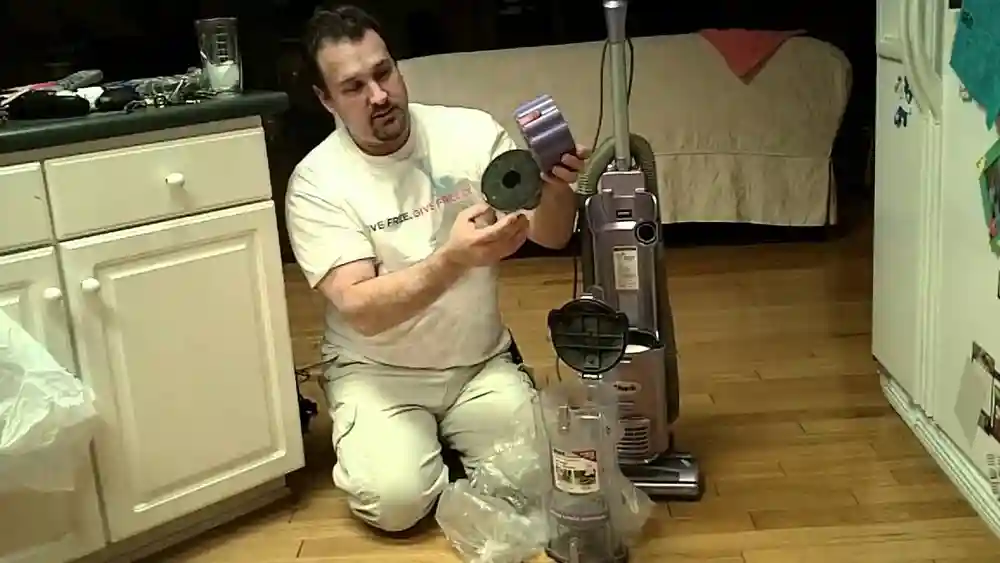
2. Clean The Filters
Most Shark Pet Vacuums have two main filters: a foam filter and a felt or HEPA filter. Here’s how to clean them:
- Remove the filters from the vacuum body. Check your manual if needed.
- Tap each filter against a trash bin to knock out loose dust.
- Rinse foam and felt filters under cold running water. Do not use soap unless the manual says it’s safe.
- Gently squeeze out excess water. Don’t twist or wring.
- Lay filters flat on a towel and let them air dry for 24 hours. Never reinstall wet filters.
Non-obvious tip: Never put filters in the dishwasher or washing machine. They can break down and stop working.
HEPA filters need less frequent washing—usually every three months. Some models use non-washable HEPA filters; if yours is non-washable, just tap it gently and replace as recommended.
If your filters still look dirty after rinsing, soak them in clean water for 30 minutes, then rinse again. For stubborn odors, sprinkle a small amount of baking soda onto the filter, rub gently, and rinse thoroughly. Make sure all cleaning products are fully removed before drying.
Filters are critical for keeping dust and allergens inside the vacuum. Using damaged or wet filters can reduce your vacuum’s ability to trap particles. If your filter feels soft or spongy after drying, it’s still good. If it feels stiff, cracked, or won’t clean well, it’s time to replace.
Many users forget to check the filter housing. Wipe inside the housing with a damp cloth to remove dust and dirt. This keeps new filters cleaner longer.
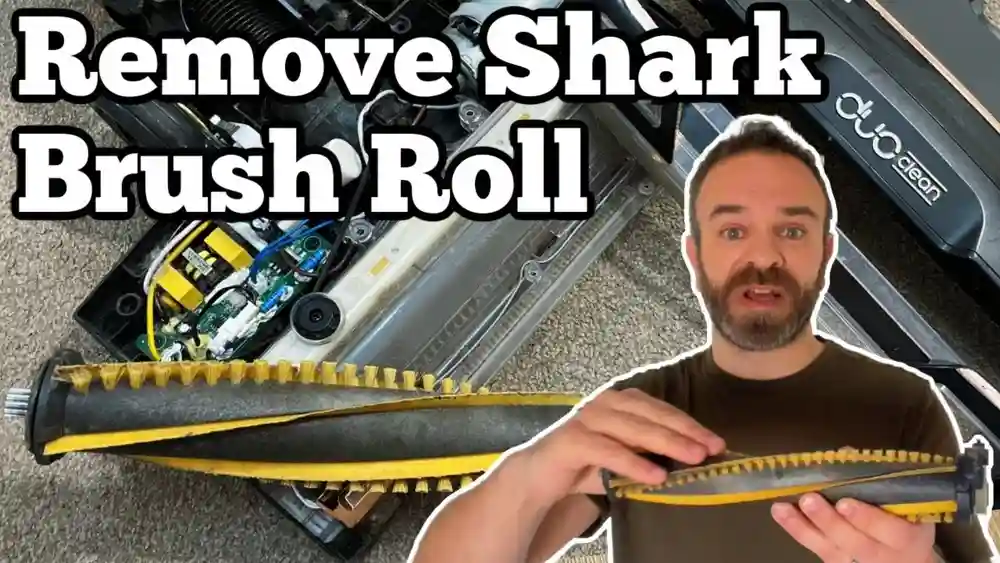
3. Tackle The Brush Roll
Pet hair loves to wrap around the brush roll, stopping it from spinning well.
- Turn the vacuum upside down.
- Remove the bottom plate if your model has one (some have clips, others need a screwdriver).
- Use scissors or a seam ripper to cut away hair and threads. Pull them off the brush.
- Wipe the brush roll with a damp cloth.
- Spin the brush roll by hand to check for smooth movement.
Expert advice: If your brush roll is removable, take it out and wash it with soapy water. Dry completely before putting it back.
For self-cleaning brush rolls, check for hair around the edges and sensors, not just the main roller.
If you notice the brush roll isn’t spinning as easily, check for debris in the bearings or around the ends. Sometimes dirt builds up inside the brush roll housing. Use compressed air or a small brush to clean these spots.
Brush rolls with worn bristles won’t pick up dirt as well. If you see bristles missing or flattened, consider replacing the roll. For vacuums with LED lights near the brush roll, clean around the lights too. Dust can block the light and make it harder to spot dirt.
4. Check Hoses And Attachments
Blocked hoses can kill suction power. Here’s how to clear them:
- Detach the hose and all attachments.
- Hold the hose up to a light—you should see through it.
- If blocked, push a broom handle or straightened coat hanger through (gently).
- Wash hoses and attachments with soapy water.
- Rinse and air dry completely.
Hidden insight: Pet hair often gets stuck in bends or joints. Flex the hose while cleaning to loosen debris.
When washing attachments, pay attention to small brushes and crevice tools. Pet hair can lodge inside brush bristles, so use a comb or toothbrush to remove it. For stubborn blockages, fill the hose with warm water and shake gently, then pour out the water and rinse.
Don’t forget to check inside the vacuum where the hose attaches. Dirt can build up at these points, especially if you vacuum pet beds or carpets often.
If your vacuum has a powered hose or motorized attachment, never submerge it in water. Instead, wipe with a damp cloth and use compressed air for the inside.
5. Wipe Down The Vacuum Body
Dust, fur, and dander can collect on the outside.
- Use a damp microfiber cloth to wipe all surfaces.
- Clean buttons, handle, and wheels.
- Dry with a clean towel.
For stubborn spots, a little soapy water on the cloth helps.
Cleaning the outside not only keeps your vacuum looking new, it also prevents dust from falling back into the air during use. Pay special attention to the handle and control buttons, as hands transfer oils and dirt. For wheels, check for hair wrapped around the axles and remove it.
If your vacuum has a display screen or indicator lights, use a dry cloth to avoid damaging electronics. For textured surfaces, a toothbrush or small brush helps lift dirt from grooves.
6. Inspect For Damage Or Wear
Look for cracks, tears in the hose, or worn brushes. If you see damage:
- Order genuine Shark replacement parts if needed.
- Don’t use tape or glue for permanent fixes—it can reduce airflow and cause new problems.
Beginner mistake: Ignoring small cracks can lead to bigger breaks and costlier repairs.
Check the hose for soft spots, which can indicate weakening material. Inspect seals and gaskets for wear, as leaks here can reduce suction. If you see loose screws or missing clips, order replacements. Genuine parts fit better and last longer than generic replacements.
If your vacuum is making strange noises or vibrating, it may be a sign of internal damage. Listen for rattling sounds and check for loose parts. Prompt repairs can prevent bigger problems.
7. Reassemble And Test
When every part is completely dry, put your vacuum back together. Follow these steps:
- Insert filters in the correct order.
- Attach the dust cup.
- Reconnect the hose and brush roll.
- Plug in and turn on.
Test suction and brush roll movement. If something sounds odd, turn off and check assembly again.
If your vacuum has variable settings, test each one to ensure proper function. A quick test on a small area of carpet helps confirm cleaning power. If you notice weak suction, check for missed steps or wet parts.
After cleaning, run your vacuum for a minute without picking up dirt. This helps clear out any remaining dust and ensures everything works smoothly.
How Often Should You Clean Your Shark Pet Vacuum?
Cleaning frequency depends on your home, pets, and vacuum use. Here’s a simple guide:
| Cleaning Task | With Pets | Without Pets |
|---|---|---|
| Empty Dust Cup | After Every Use | Every 2-3 Uses |
| Wash Filters | Monthly | Every 3 Months |
| Clean Brush Roll | Every 2 Weeks | Monthly |
| Wipe Vacuum Body | Monthly | Quarterly |
| Check Hoses | Monthly | Every 3 Months |
Insight: Homes with long-haired pets or multiple animals may need even more frequent cleaning.
If you notice your vacuum losing suction or smelling bad, clean it sooner. Setting reminders on your phone or calendar helps you keep a regular schedule. For busy homes, a quick clean every week can save time and keep your vacuum running better.

Credit: www.youtube.com
Common Mistakes To Avoid
Many Shark Pet Vacuum owners make simple errors that reduce vacuum life. Watch out for these:
- Washing filters too often – Over-washing can break them down. Follow manufacturer guidelines.
- Skipping air drying – Wet parts can cause mold inside the vacuum.
- Reassembling while damp – Always let everything dry fully.
- Forgetting hidden areas – Dust collects in hose joints and brush roll ends.
- Using harsh cleaners – Bleach or strong chemicals can damage plastic and filters.
- Overfilling the dust cup – This makes the motor overheat and shortens vacuum life.
Some beginners forget to check attachments and hoses for hidden dirt. Always inspect these areas for pet hair and debris. Another mistake is ignoring the filter housing. Dust builds up here and can block airflow.
Many people use hot water on filters, but this can damage some materials. Always use cold or lukewarm water. Never use fabric softener or scented cleaners—these leave residues that can block filters.
How To Deal With Bad Odors
Pet vacuums can smell if not cleaned well. Here’s how to keep yours fresh:
- Empty the dust cup after each use.
- Wash filters regularly.
- Add a spoon of baking soda to the dust cup (optional) to absorb odors.
- Wipe inside with a vinegar solution (mix 1 part vinegar to 3 parts water) if smells persist.
- Let all parts dry in sunlight if possible—UV light helps kill bacteria.
Non-obvious tip: Smells often come from the brush roll. Wash it thoroughly if odor won’t go away.
If your vacuum still smells after cleaning, check for hidden pet hair in the hose or attachments. Sometimes wet dirt sticks inside the hose and grows mold. Rinse hoses with vinegar solution and dry in sunlight if possible.
For tough odors, place a few drops of essential oil on a cotton ball and leave it inside the dust cup (remove before vacuuming). Avoid using air fresheners directly on filters, as they can block airflow.
When To Replace Parts
Even with good care, some parts wear out. Here’s a simple lifespan estimate:
| Part | Expected Lifespan | Replacement Signs |
|---|---|---|
| Foam Filter | 6-12 Months | Rips, won’t get clean, loss of suction |
| HEPA Filter | 1-2 Years | Odor, visible dirt that won’t wash out |
| Brush Roll | 1-2 Years | Bristles worn down, not spinning well |
| Hose | 2-5 Years | Cracks, loss of suction, visible holes |
Get genuine Shark parts for the best fit and performance.
When replacing filters, keep old ones as backups in case you need a temporary replacement. For brush rolls, choose ones with the same bristle type and length. Using the wrong size can damage your vacuum or reduce cleaning efficiency.
If your vacuum loses suction even after cleaning, check for worn seals and gaskets. These parts may need replacement every few years, depending on use.
Tips For Different Shark Pet Vacuum Models
Not all Shark vacuums are the same. Here’s what to know for popular types:
Upright Models
- Usually have bigger dust cups and brush rolls.
- Filters are often under the dust cup or behind a cover.
- Some have LED indicator lights—clean around sensors too.
Upright models are best for large homes or heavy pet shedding. Their bigger size means more dirt capacity but also more parts to clean. The brush roll is often easier to remove, making deep cleaning simpler.
Stick Models
- Lighter and easier to take apart.
- Dust cups are smaller, so empty more often.
- Battery models: Remove battery before cleaning.
Stick models are great for apartments or quick cleaning. Their lightweight design makes them easy to carry but means you need to clean more often. Battery-powered models require special care—never wash the battery compartment.
Handheld Models
- Simple design, but tiny dust cups fill fast.
- Filters are small and need careful handling.
Handheld models are perfect for spot cleaning—pet beds, cars, and furniture. Their smaller parts mean cleaning takes less time, but you need to be gentle to avoid damage. Always check for hair inside small attachments.
Pro tip: Always check your manual for special instructions. Some new Shark models have washable or non-washable parts—mixing them up can cause damage.
If your model has advanced features (like anti-hair wrap or self-cleaning brush roll), check those parts for hidden dirt. Even “self-cleaning” features need occasional manual attention.
Advanced Cleaning: Deep Cleaning And Maintenance
Every 6-12 months, give your Shark Pet Vacuum a full deep clean:
- Disassemble as much as possible. Remove all filters, brush roll, hose, and attachments.
- Soak washable parts (dust cup, hose, brush roll) in warm, soapy water for 10-15 minutes.
- Use a soft brush to scrub away stubborn dirt.
- Rinse well and let air dry for 24-48 hours.
- Check motor vents (but never wash the motor!). Use compressed air to blow out dust.
- Clean sensors and wheels with a damp cloth.
- Reassemble and check everything before using.
Bonus tip: Mark your calendar for deep cleaning every spring and fall to keep your vacuum in top shape.
If your vacuum has a battery, remove it before deep cleaning. Never soak electrical parts—use a dry brush or compressed air only. For models with removable wheels, check for hair wrapped around the axles and clean thoroughly.
Deep cleaning helps prevent build-up that can cause odor, reduced suction, or motor damage. Many users notice improved performance after a thorough clean.
Troubleshooting: If Your Shark Pet Vacuum Loses Suction
If you notice your vacuum isn’t picking up well, try these steps before calling for repairs:
- Empty the dust cup.
- Check and clean all filters.
- Clear the hose and brush roll.
- Look for blockages in the intake or exhaust.
- Inspect seals and gaskets for damage.
If these steps don’t help, it may be time to replace filters or call Shark customer support.
Sometimes suction loss comes from clogged vents or loose parts. If your vacuum is louder than usual, check for air leaks around the dust cup or hose. For battery models, weak suction may mean a low battery—charge fully before testing.
Cleaning For Allergy Control
Pet dander and dust can trigger allergies. To keep your air clean:
- Use a Shark model with a HEPA filter.
- Clean filters and dust cup more often (every two weeks).
- Wash or replace your vacuum’s filter after cleaning up heavy pet shedding.
- Vacuum in a well-ventilated room and wear a mask during cleaning.
Extra insight: Vacuuming with dirty filters can blow allergens back into the air, making allergy symptoms worse.
For extra protection, consider using an air purifier in rooms where you vacuum often. If you have children or elderly family members, frequent cleaning helps reduce health risks.
Storing Your Shark Pet Vacuum After Cleaning
Proper storage keeps your vacuum clean and ready:
- Store in a dry, cool place.
- Hang hoses and cords loosely—tight loops can crack them.
- Keep attachments in a bag or box.
- Never store with water inside—double-check all parts are dry.
Pro tip: Run the vacuum for a minute after reassembly (without cleaning) to check airflow and clear out remaining dust.
If your vacuum has a removable battery, store the battery separately in a cool, dry spot. For long-term storage, cover the vacuum to keep dust off.
Sustainable Cleaning: Eco-friendly Tips
To clean your vacuum with less impact:
- Use biodegradable dish soap.
- Dry parts in sunlight to avoid using electricity for drying.
- Recycle used filters and parts properly—check your local recycling rules.
- Avoid single-use wipes; use washable microfiber cloths instead.
Non-obvious tip: Some old filters can be composted if made only of natural materials—check with the manufacturer.
If you need to dispose of old vacuum parts, check for special recycling programs in your area. Some cities have electronics recycling that accepts vacuum parts.
Using reusable cleaning tools saves money and reduces waste. If you clean often, buy a set of washable cloths and brushes.
Comparing Shark Pet Vacuum Maintenance To Other Brands
Shark Pet Vacuums are popular for their easy maintenance, but how do they compare to similar brands? Here’s a quick look:
| Brand | Filter Cleaning | Brush Roll Maintenance | Ease of Disassembly |
|---|---|---|---|
| Shark | Washable foam & HEPA | Easy to access, self-cleaning (some models) | Simple, tool-free for most parts |
| Dyson | Washable, but HEPA often sealed | Brush roll can be harder to remove | Moderate, some screws/tools needed |
| Bissell | Washable filters | Removable brush, but hair can tangle easily | Simple, but more fragile clips |
| Hoover | Washable and replaceable filters | Brush roll often fixed | Moderate, more screws |
Takeaway: Shark makes it easier for pet owners to keep their vacuum clean, with less time and effort.
Shark’s design focuses on easy access to filters and brush rolls, which is great for homes with pets. Other brands may require tools or extra steps to clean parts. Shark’s self-cleaning brush roll is especially helpful for pet owners, saving time and reducing manual cleaning.

Credit: www.lowes.com
Resources For Further Help
If you need more detailed instructions, visit the official Shark Clean Support Center for videos, manuals, and troubleshooting guides.
You can also find community forums and YouTube channels with model-specific tutorials for visual learners.
If you’re unsure about a step, check for video guides—seeing the process makes it easier to follow. For replacement parts, Shark’s support site shows compatible products and ordering tips.
Frequently Asked Questions
How Often Should I Clean The Filters On My Shark Pet Vacuum?
For homes with pets, clean the foam and felt filters every month. Wash them with cold water, let them air dry, and never reinstall until fully dry. If you have heavy shedding pets or allergies, clean every 2 weeks.
Can I Use Soap To Clean Shark Vacuum Filters?
You can use a small amount of mild dish soap for tough dirt on foam filters if the manual allows. For HEPA or felt filters, usually just water is safest. Always check your user guide to avoid damaging the filter material.
Why Does My Shark Pet Vacuum Smell After Cleaning?
Odors can linger if parts are not fully dry or if pet hair is left in the brush roll. Try washing all washable parts, use baking soda in the dust cup, and let items dry in sunlight to kill odor-causing bacteria.
What Should I Do If The Brush Roll Stops Spinning?
First, unplug the vacuum and remove the bottom plate. Clear all hair and debris from the brush roll and its ends. If it still doesn’t spin, check for blockages or worn parts. Some models have a reset button—refer to your manual.
Is It Safe To Clean The Motor Or Electrical Parts?
No, never wash or get the motor or electrical parts wet. Only use a dry brush or compressed air to remove dust from vents. If the motor seems dirty or is making noise, call Shark support for service.
Caring for your Shark Pet Vacuum is simple once you know the steps. Regular, thorough cleaning not only extends your machine’s life, but also keeps your home fresher and healthier for you and your pets. With a little care, your vacuum will stay powerful for years—and you’ll spend more time enjoying your clean home, not fighting with pet hair.