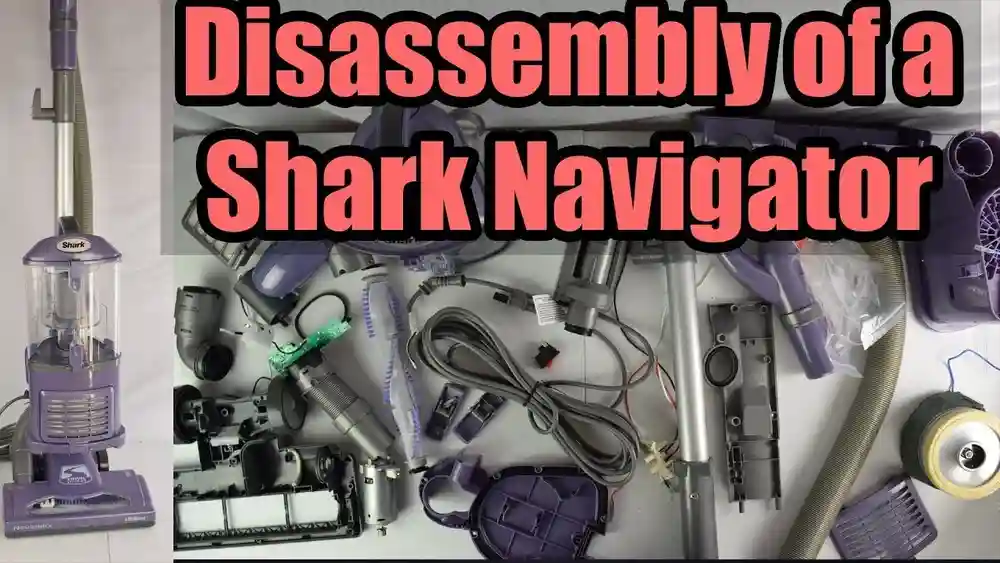
Disassembling a Shark Navigator vacuum can seem like a big task, especially if you have never taken apart a vacuum before. Many people worry about breaking something or not being able to put the parts back together. But with the right guidance, you can safely take apart your Shark Navigator for deep cleaning, troubleshooting, or replacing broken parts.
Doing this yourself not only saves money but also gives you a better understanding of how your vacuum works. In this guide, you’ll learn every step of the process, from preparing your space to reassembling the vacuum, with practical tips and insights that even experienced users sometimes miss.
Why Disassemble Your Shark Navigator Vacuum?
Before getting into the steps, it’s important to know why you might need to take apart your Shark Navigator vacuum. Regular use can cause hair, dust, and debris to build up inside. This affects suction and can even damage the motor if not cleaned out. Sometimes, parts get clogged or worn out, and you need to access them for repair or replacement. Disassembling your vacuum allows you to:
- Deep clean internal parts
- Remove clogs and blockages
- Check for damaged or worn components
- Replace filters, belts, or brush rolls
- Increase vacuum lifespan
Many users overlook the importance of deep cleaning the internal areas or checking the hose for hidden blockages, which can make a big difference in performance.
What You’ll Need
Gathering the right tools and materials before you start will make disassembly easier and safer. Here’s what you’ll need:
- A Phillips-head screwdriver (medium size)
- A flat-head screwdriver
- A pair of pliers
- A small brush (an old toothbrush works well)
- A clean, dry cloth or towel
- A small bowl or magnetic tray (for screws)
- A pair of scissors (for hair and string removal)
- Replacement parts (if you plan to swap out filters or belts)
- Protective gloves (optional, but helpful for hygiene)
Having all these items ready will save you time and help you avoid losing screws or small components.
Safety First: Precautions Before Disassembly
Safety is key. Taking apart any electrical appliance involves risks, but most can be avoided by following a few simple rules:
- Unplug the vacuum: Never work on a plugged-in vacuum. This avoids electric shock or starting the machine by accident.
- Work in a clean, well-lit area: A large table or clean floor space is ideal. Good lighting helps you see small screws and parts.
- Take photos as you go: Use your phone to snap pictures at each step. This is a lifesaver when reassembling, especially if you’re unsure where something goes.
- Keep children and pets away: Small parts can be choking hazards, and you want to avoid distractions.
Many beginners forget to take photos or keep screws organized, which makes reassembly much harder. Always keep parts and screws in a small bowl or tray.
Getting To Know Your Shark Navigator
The Shark Navigator series includes several models, but most share a similar design. Understanding the main parts helps you know what to expect as you take it apart. The main components are:
- Dust cup/canister: The clear bin that holds dust and debris.
- Filter assembly: Usually includes one or two filters.
- Brush roll: The spinning brush that picks up dirt from carpets.
- Floor nozzle: The base where the brush roll sits.
- Hose: Flexible tube connecting parts.
- Motor unit: The main body housing the motor.
- Wand and handle: The long tube and grip for upright use.
Taking a few moments to examine your vacuum and its parts will help you feel more confident. If your model is slightly different, check the owner’s manual or look up the exact model on the Shark official website.
Step-by-step Guide To Disassemble A Shark Navigator Vacuum
Let’s break down the process into clear steps. Each section covers a specific part of the vacuum, with detailed instructions and practical tips.
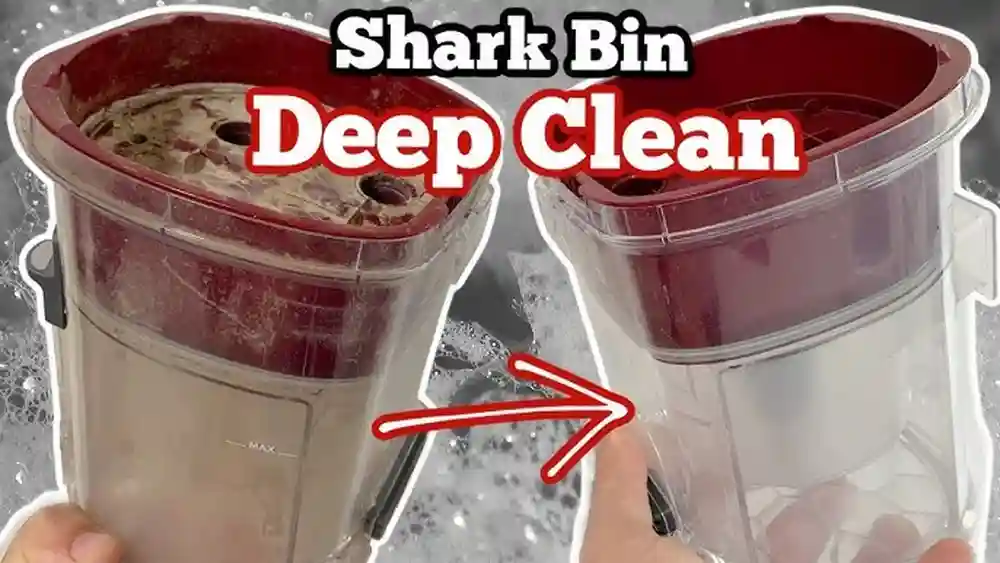
1. Remove The Dust Cup
Start by separating the easiest and most accessible part.
- Press the dust cup release button (usually near the handle).
- Lift the dust cup straight out.
- Empty any debris into the trash.
- Set the dust cup aside for cleaning.
This step is simple, but many users forget to check for trapped dust in the lid and bottom flap—clean these areas to avoid unpleasant smells.
2. Take Out And Clean The Filters
Most Shark Navigators have at least two filters: a foam filter and a felt filter. Some models also have a HEPA filter.
- Locate the filter compartment, usually under the dust cup.
- Remove the foam and felt filters. Note the order and position.
- If your model has a HEPA filter, it’s often in a separate compartment near the base.
- Wash foam and felt filters in cold water only. Do not use soap.
- Allow filters to air dry for 24 hours before reinstalling.
A common mistake is putting wet filters back in, which can cause mold or motor damage. Always ensure filters are completely dry.
3. Disconnect The Wand And Hose
Next, separate the wand and hose from the vacuum body.
- Press the release button or lever on the wand.
- Pull the wand straight out.
- Twist off the hose from both ends (one at the body, one at the floor nozzle).
- Check the hose for blockages. Push a broom handle or long stick through if needed.
Hidden clogs in the hose are a frequent cause of poor suction, but they’re often missed during quick cleaning.
4. Remove The Floor Nozzle
The floor nozzle is where the brush roll sits and is key to deep cleaning or repair.
- Lay the vacuum flat on its back.
- Use a coin or screwdriver to turn the locks on the bottom plate (usually two or three).
- Lift off the plate and set aside.
- Some models have small screws instead of locks. Remove these carefully and keep them in your bowl.
Check for tangled hair or string around the brush roll before moving to the next step.
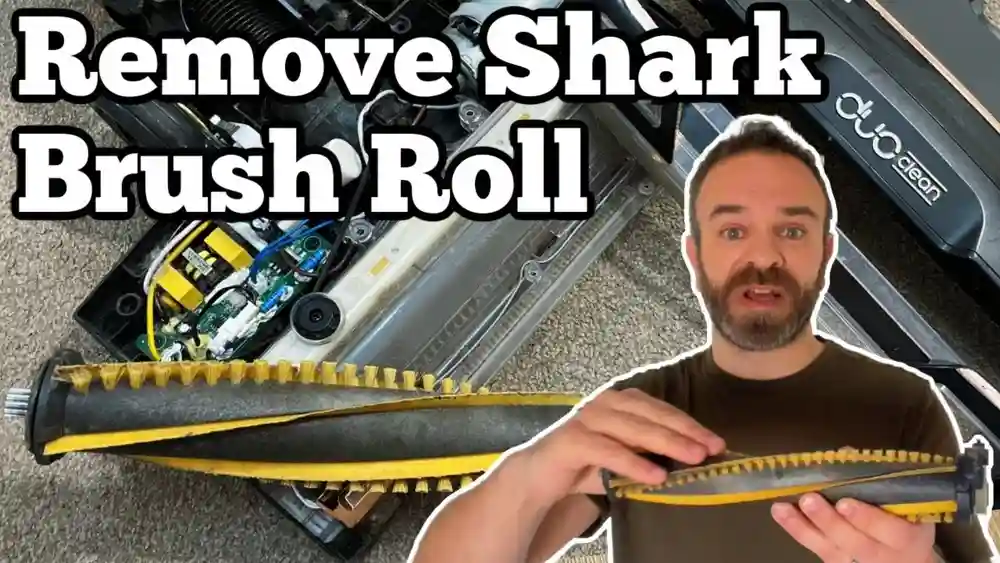
5. Take Out The Brush Roll
Removing the brush roll lets you clean or replace it if needed.
- Gently pull the brush roll out of the nozzle. Some models require you to slide it sideways.
- Use scissors to cut away hair or fibers wrapped around the brush.
- Wipe the brush roll with a dry cloth.
If the brush roll is damaged, now is the perfect time to replace it.
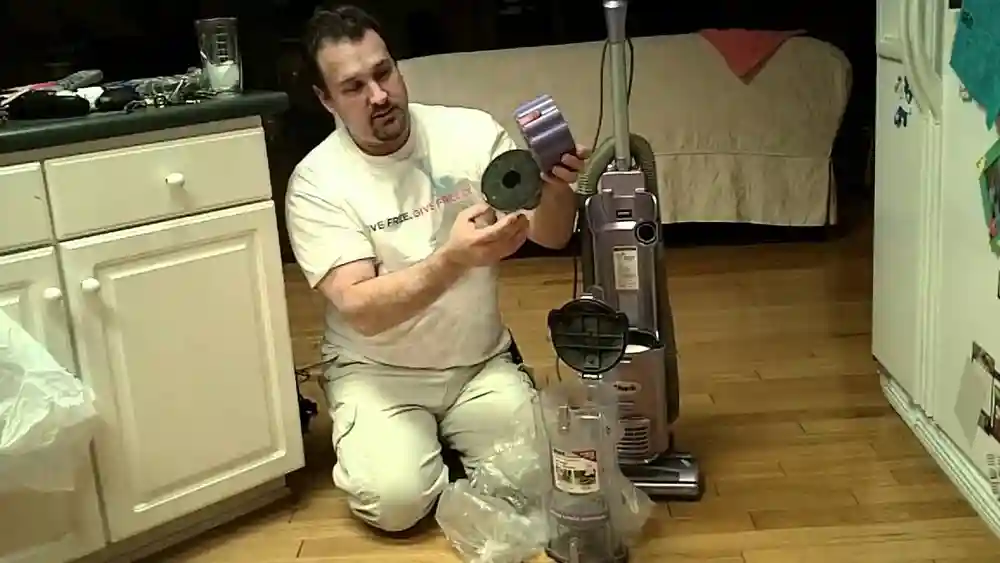
6. Access The Motor Compartment
This is the most technical part and should only be done if you need to clean out the motor area or check for blockages near the motor.
- Locate screws holding the motor compartment cover. These are usually on the underside of the vacuum.
- Remove screws using the Phillips-head screwdriver.
- Carefully lift off the cover. Do not force it if it feels stuck; check for hidden screws.
- Look for dust buildup or blockages near the motor.
- Use a small brush or cloth to gently clean.
Avoid touching any wiring or pulling on connections. If you’re not comfortable, skip this step or consult a professional.
7. Inspect And Clean Small Parts
Lay out all the parts you’ve removed. Take the time to:
- Wipe each part with a clean cloth.
- Check for cracks, broken pieces, or excessive wear.
- Replace any worn-out filters, belts, or brush rolls.
- Clean connectors and seals for a tight fit during reassembly.
Many people forget to check rubber seals, which can cause air leaks if cracked or dirty.
8. Deep Clean And Dry Every Component
Before putting your vacuum back together, make sure every part is completely clean and dry.
- Wash the dust cup with mild soap and water.
- Let all washable parts dry for at least 24 hours.
- Wipe non-washable parts with a damp cloth and dry thoroughly.
Moisture can lead to mildew or electrical problems, so don’t rush this step.
How To Reassemble Your Shark Navigator Vacuum
After cleaning and inspecting all parts, it’s time to put everything back together. If you took photos during disassembly, use them as a guide.
- Replace the motor compartment cover and screw it back in place.
- Slide the brush roll back into the floor nozzle.
- Reattach the bottom plate or secure with screws.
- Connect the hose to the floor nozzle and the vacuum body.
- Reinsert the wand into place.
- Make sure filters are fully dry, then put them back in the correct order.
- Snap the dust cup back onto the main body.
Double-check every connection. Test the vacuum in a low-traffic area before regular use to make sure everything is working correctly.
Troubleshooting Tips During Disassembly
Sometimes, things don’t go as planned. Here are solutions to common issues:
- Stuck screws: Apply a small amount of WD-40 and wait a few minutes, then try again with a larger screwdriver.
- Parts won’t come apart: Check for hidden latches or screws. Gently wiggle parts rather than forcing them.
- Lost screws: Use a magnet to find screws on the floor or in the carpet.
- Parts don’t fit during reassembly: Review your photos and check for upside-down or backwards pieces.
Never force parts back together. A gentle hand ensures everything aligns as intended.
Comparing Shark Navigator Models: Disassembly Differences
Not all Shark Navigator vacuums are identical. Some have extra features or slightly different assembly. Below is a comparison of three popular Navigator models and how their disassembly steps differ:
| Model | Filter Type | Brush Roll Access | HEPA Filter Location |
|---|---|---|---|
| Navigator Lift-Away (NV352) | Foam, Felt, HEPA | Bottom plate with locks | Base, front panel |
| Navigator Swivel Pro (ZU62) | Foam, Felt | Bottom plate with screws | No HEPA filter |
| Navigator DLX (NV70) | Foam, Felt, HEPA | Side access panel | Back, removable panel |
The main differences are the number and placement of filters, and how you access the brush roll. Always check your user manual if you’re unsure.

Credit: www.ifixit.com
Cleaning And Maintenance Tips After Disassembly
Regular maintenance keeps your Shark Navigator running like new. Here are some practical tips:
- Clean filters every three months or more often if you have pets.
- Wash the dust cup monthly.
- Check the brush roll for tangles every few weeks.
- Inspect the hose for blockages after vacuuming large debris.
- Replace filters and belts as soon as they show signs of wear.
A well-maintained vacuum lasts longer and keeps suction strong.
Common Mistakes To Avoid
Disassembling your vacuum can go smoothly if you avoid these common errors:
- Forgetting to unplug: This is the most dangerous mistake.
- Rushing the process: Take your time, especially with small screws.
- Mixing up screws: Different lengths fit different places. Keep them organized.
- Not drying parts: Even a little moisture can cause problems.
- Skipping photos: Photos are the easiest way to avoid confusion.
Many users make the mistake of cleaning only what they see, missing hidden dust in hoses or connectors.
Credit: kountrykidslearningcenter.com
Signs Your Shark Navigator Needs Disassembly
You might wonder how often you need to take your vacuum apart. Here are signs it’s time for a deep clean:
- Loss of suction: Most often caused by a clog or dirty filters.
- Strange noises: A rattling sound may mean something is stuck inside.
- Burning smell: This can signal a tangled brush roll or blocked motor.
- Dust escaping: Leaking dust means seals or filters need cleaning or replacing.
- Brush roll not spinning: Usually caused by tangled debris or a broken belt.
If you see any of these issues, don’t wait—disassemble and clean your vacuum right away.
How Disassembly Extends The Life Of Your Vacuum
Many people replace their vacuums too soon. Regular disassembly and deep cleaning can make your Shark Navigator last for years. Keeping the motor free of dust, replacing worn parts, and cleaning filters protects the most expensive components. This small investment of time saves money and keeps your home cleaner.
Environmental Impact: Repair Versus Replace
Choosing to repair and maintain your vacuum instead of buying a new one is also better for the environment. Manufacturing and shipping new appliances creates waste and uses resources. By extending your Shark Navigator’s life, you reduce your carbon footprint.
According to the EPA, over 12 million tons of small appliances are thrown out each year in the United States alone. Keeping your vacuum in service longer is a simple way to help the planet.
When To Call A Professional
Some repairs are best left to experts, especially if:
- The motor is burned out or making grinding noises.
- There are electrical problems or exposed wiring.
- The vacuum still does not work after full cleaning and reassembly.
In these cases, visit an authorized repair center or contact Shark customer service. For more information, see the Shark official support page.
Shark Navigator Disassembly: Quick Reference Table
Here’s a summary of each part, how to remove it, and what to check:
| Part | How to Remove | What to Check/Clean |
|---|---|---|
| Dust Cup | Release button, lift out | Wash, check for cracks |
| Filters | Lift from compartment | Wash, dry, replace if worn |
| Brush Roll | Remove base plate, pull out | Remove hair, check for damage |
| Hose | Twist off ends | Clear blockages, check for holes |
| Motor Compartment | Unscrew cover | Dust, check for obstructions |
Use this as a checklist each time you disassemble your vacuum.
How To Store Your Shark Navigator After Disassembly
Proper storage after cleaning and disassembly helps avoid damage:
- Store all parts in a clean, dry place.
- Keep screws and small pieces in a labeled bag or container.
- Avoid direct sunlight, which can weaken plastic over time.
- Reassemble and store upright to prevent bending hoses or wands.
If you’re storing the vacuum for a long time, remove filters and keep them in a breathable bag.
Replacement Parts: What To Buy And Where
Over time, you may need new filters, belts, or brush rolls. Always choose genuine Shark parts to keep your vacuum working its best. You can buy these from:
- The official Shark website
- Large retailers (Amazon, Walmart, Target)
- Authorized repair shops
Avoid very cheap knockoff parts, as they can wear out quickly or damage your vacuum.
What Sets Shark Navigator Apart
The Shark Navigator is popular for its strong suction, easy-to-remove parts, and simple maintenance. Many other vacuums require special tools or are difficult to take apart. With the Navigator, most users can handle cleaning and small repairs themselves, saving money and avoiding downtime.

Credit: www.youtube.com
Advanced Tips: Going Beyond Basic Disassembly
For those comfortable with more advanced repairs, you can take apart the motor assembly or replace switches. This involves:
- Carefully labeling each wire and connector.
- Using a multimeter to check for faulty switches.
- Replacing worn or melted wires with the same gauge.
If you go this far, always double-check wiring diagrams and work slowly. If you feel unsure at any point, stop and seek professional help.
What To Do If You Lose A Part
Lost a screw or small piece? Here’s what you can do:
- Check under furniture and in the vacuum’s dust cup.
- Look for parts diagrams on the Shark website.
- Order replacements directly from Shark or an authorized dealer.
Don’t use hardware-store screws unless they match exactly, as the wrong size can damage your vacuum.
Reassembling: Testing For Success
Once you’ve put your Shark Navigator back together, plug it in and run a quick test:
- Listen for normal motor sounds.
- Check suction power with your hand at the hose end.
- Inspect the brush roll for smooth spinning.
- Make sure there’s no dust leaking from seams.
If anything seems off, unplug and check your assembly steps and photos.
Keeping A Maintenance Log
If you use your vacuum often or have a large home, keep a simple log of cleaning and repairs. Write down:
- The date of each deep clean or part replacement
- Any unusual noises, smells, or problems
- The steps you took to fix issues
This helps you spot patterns and know when to order new parts.
Frequently Asked Questions
How Often Should I Disassemble And Clean My Shark Navigator Vacuum?
For most homes, deep cleaning and disassembly every 3 to 6 months is enough. If you have pets, allergies, or a lot of carpet, do it more often. Clean filters monthly for best results.
Can I Wash All Shark Navigator Filters?
You can wash foam and felt filters with just water. Never use soap or hot water. HEPA filters can be rinsed, but check your manual—some models recommend replacing them instead.
What Do I Do If The Brush Roll Won’t Spin After Reassembly?
Check for tangled hair, a misaligned brush roll, or a loose belt. Make sure the brush roll is seated correctly and the bottom plate is attached firmly. If it still doesn’t spin, the belt may need replacement.
Is It Safe To Use Non-shark Replacement Parts?
It’s best to use genuine Shark parts. Off-brand filters or belts may fit poorly, wear out faster, or even damage your vacuum. Always buy from trusted sources.
Where Can I Find Step-by-step Videos For My Exact Shark Navigator Model?
The official Shark website and YouTube have many model-specific guides. See the Shark Clean support page for videos, manuals, and troubleshooting.
Taking apart your Shark Navigator vacuum might feel intimidating at first, but with the right steps and a little patience, you can handle it like a pro. Regular deep cleaning and basic repairs help you avoid expensive replacements and keep your home spotless.
Remember to work safely, keep track of parts, and consult your manual or Shark’s support page if you get stuck. Your vacuum will thank you with years of strong, reliable performance.