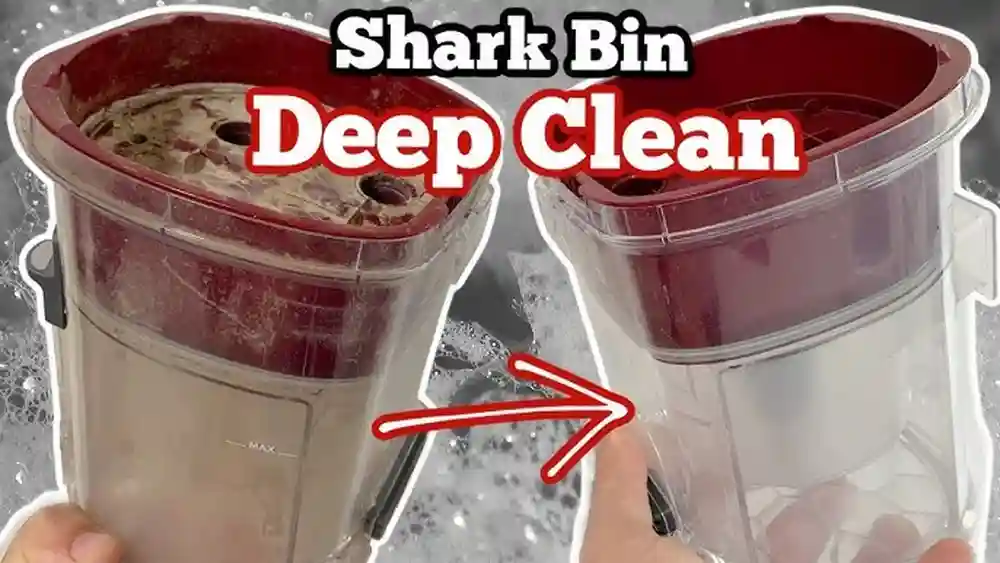
Keeping your home clean often means making sure your cleaning tools are in top shape. If you own a Shark vacuum, you know its roller is a workhorse—it grabs hair, dust, and debris from carpets and floors. But, after a while, the roller gets tangled, dirty, and less effective. Many people ignore it until the vacuum stops picking up dirt well or starts making odd noises. Cleaning the vacuum roller might seem tricky, but with the right steps and some attention, it’s simple, safe, and will make your vacuum work like new.
Let’s explore exactly how to clean a Shark vacuum roller—what you’ll need, how to remove and clean the roller, and how to keep it running smoothly for years. Along the way, you’ll pick up tips that even experienced users often miss.
By the end, you’ll have all the practical advice to maintain your Shark vacuum like a pro.
Why Cleaning Your Shark Vacuum Roller Matters
Many people underestimate the impact of a dirty roller. The vacuum roller, sometimes called a brush roll or brush bar, is the part that spins and lifts dirt into the machine. Over time, the roller collects:
- Pet hair
- String and thread
- Dust and dander
- Carpet fibers
As these build up, the roller slows down or even stops spinning. This leads to weaker suction and poor cleaning. In extreme cases, the motor can overheat, causing permanent damage. Regular cleaning prevents these problems and helps the vacuum last longer.
Not Just About Clean Floors
A clean roller does more than just pick up more dirt. It also:
- Reduces strain on the motor
- Cuts down on bad odors
- Lowers the risk of allergens spreading in your home
Many users only realize this after facing a costly repair or a sudden breakdown.
How Often Should You Clean The Roller?
Most Shark vacuums need their roller cleaned every one to three months. But, if you have pets, long hair, or thick carpets, monthly cleaning is best. Heavy users might even check every two weeks.
Key insight: Many people clean the roller only when there’s a problem. But, routine cleaning keeps suction strong and prevents bigger issues.
Tools And Supplies You’ll Need
Before you start, gather these items:
- Scissors or seam ripper (for hair and string)
- Small cleaning brush (an old toothbrush works)
- Microfiber cloth
- Mild dish soap (optional)
- Screwdriver (only for certain Shark models)
- Gloves (if you prefer not to touch dust/hair)
- Trash bag
Some Shark vacuums have a self-cleaning roller. Even then, manual cleaning is needed for deep buildup. Check your manual for the roller type.
Safety First: Power Down And Unplug
Always unplug your vacuum before cleaning. Modern Shark vacuums can store power after being switched off, so unplugging is the safest move. This prevents accidental spinning or electric shock.
Step-by-step Guide: Cleaning Your Shark Vacuum Roller
Let’s break down the process into clear steps. Each step includes tips and warnings so you can avoid mistakes that many owners make.
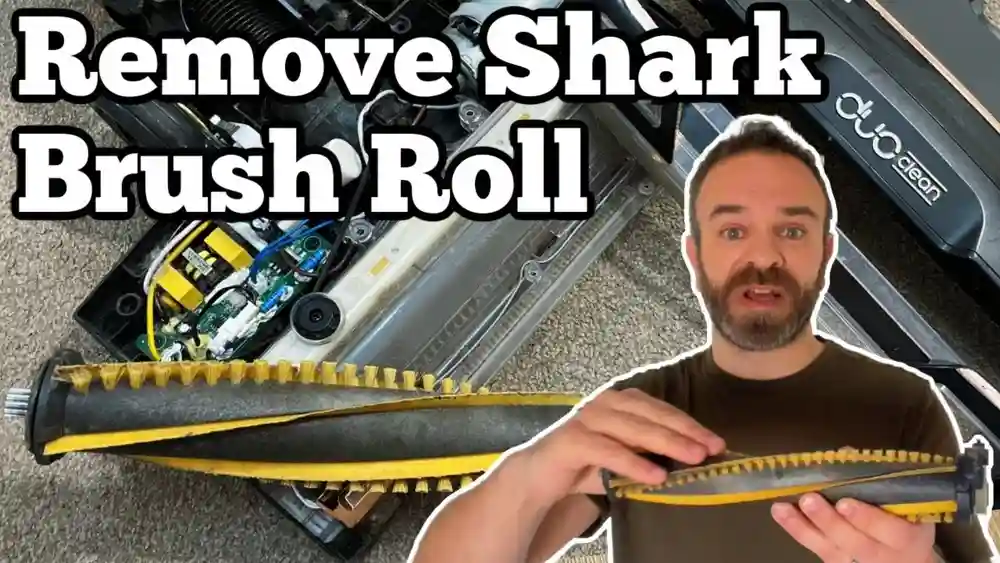
1. Access The Roller
Find the brush roll on the underside of the vacuum head. Most Shark vacuums have a cover over the roller, held by clips or screws.
- Flip the vacuum over on a clean, flat surface.
- For models with clips, release the cover by pressing the tabs.
- If there are screws, use your screwdriver to remove them. Keep screws in a small container to avoid losing them.
Tip: Take a photo before removing parts. This helps you remember the order when putting everything back.
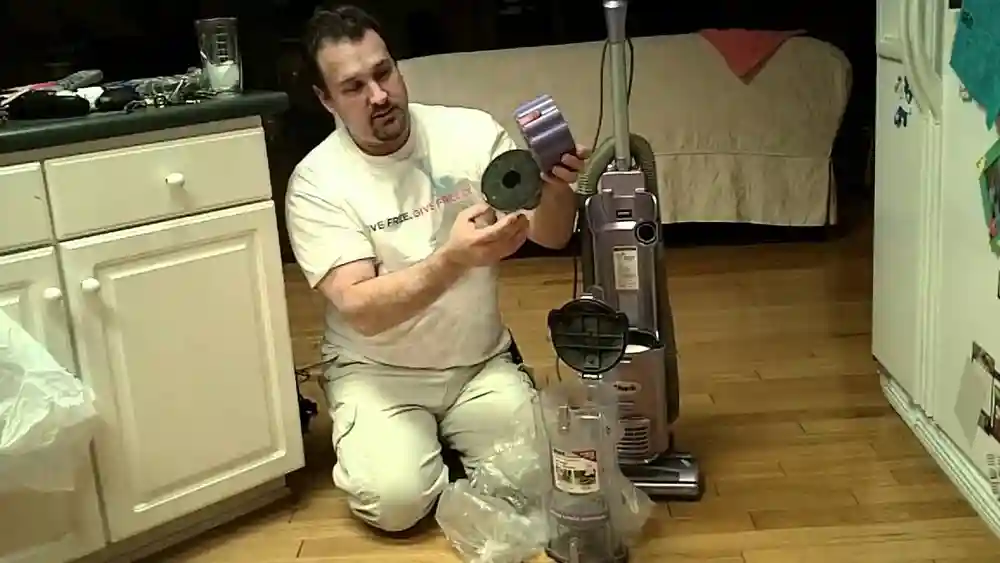
2. Remove The Roller
Some Shark models have a roller that lifts out easily. Others need gentle wiggling.
- Gently pull out the roller. Don’t force it—if it sticks, check for hidden screws or latches.
- Set aside any washers or bearings you find.
3. Remove Hair, String, And Debris
This is where most of the mess builds up.
- Use scissors or a seam ripper to cut hair or string wrapped around the roller. Cut along the grooves, not across the bristles, to avoid damage.
- Pull away all loose debris. A gloved hand can help with stubborn clumps.
Non-obvious insight: Don’t forget to check the ends of the roller—these often trap hair and can block spinning.
4. Clean The Roller Surface
- Wipe the roller with a dry microfiber cloth first.
- For sticky dirt, dampen the cloth with a little water and mild dish soap.
- Scrub the bristles and plastic parts with the small brush (like an old toothbrush).
- Avoid soaking the roller—excess water can damage the roller’s bearings.
Mistake to avoid: Don’t put the roller in a dishwasher or washing machine. This can warp plastic and destroy bearings.
5. Clean The Roller Housing
The chamber where the roller sits also gets dusty.
- Use your brush or cloth to wipe out dust and crumbs from the roller housing.
- If possible, tip the vacuum head over a trash bag and tap out loose dirt.
6. Dry Completely
Let the roller and housing air dry for at least one hour. Moisture inside your vacuum can lead to mold or damage.
7. Reinstall The Roller
- Make sure the roller is completely dry.
- Place the roller back in its slot, lining up any grooves or end caps.
- Replace washers or bearings if present.
- Snap the cover back on or re-insert screws.
Key insight: If the roller doesn’t spin freely after reassembly, check for missed debris at the ends.
8. Test The Vacuum
- Plug the vacuum back in.
- Turn it on and check that the roller spins smoothly.
- Listen for unusual noises—grinding or squeaking means something’s stuck.
If the roller still doesn’t spin, double-check your assembly. Sometimes a tiny bit of hair trapped in the bearing can stop everything.
Special Considerations For Different Shark Models
Not all Shark vacuums are the same. Some have unique rollers or self-cleaning features. Here’s a comparison to help you recognize your model’s needs.
| Shark Model | Roller Type | Cleaning Difficulty | Notes |
|---|---|---|---|
| Navigator Series | Standard bristle | Easy | Simple to remove roller |
| Rotator Series | Standard bristle | Medium | More screws on the cover |
| Rocket Series | Soft roller (DuoClean) | Medium | Extra care with fabric roller |
| AZ Series (Zero-M) | Self-cleaning | Easy | Manual cleaning still needed for heavy hair |
Practical tip: Always check your vacuum’s manual for diagrams. Some rollers have arrows showing where to cut hair, or require removing side panels for full access.
How To Deep Clean A Shark Duoclean Soft Roller
Shark’s DuoClean models have a soft, fabric-covered roller. This type picks up fine dust and large debris, but also traps sticky residue.
- Remove the soft roller according to your model’s manual.
- Wipe off loose debris with a dry cloth.
- For sticky stains, lightly dampen the cloth with soapy water. Do not soak.
- Rinse under running water if the manual allows—but always remove from the vacuum first and dry fully.
- Let the roller dry for 24 hours before reinstalling.
Non-obvious insight: The soft roller’s ends often collect hidden buildup. Twist the end caps to remove and clean them separately if possible.
Cleaning And Lubricating The Roller Bearings
Roller bearings help the brush bar spin smoothly. Hair and dirt can jam these, causing friction.
- After removing the roller, gently pull off the end caps.
- Use a cotton swab to clean out dust and hair from the bearing area.
- If the bearing looks dry or squeaky, apply a tiny drop of food-grade lubricant (never oil or WD-40).
Mistake to avoid: Don’t flood the area with lubricant—excess oil can attract more dirt.

Credit: www.youtube.com
How To Clean A Shark Vacuum Roller Without Removing It
Some users are nervous about disassembling their vacuum. While removal is best, you can do a quick clean without taking out the roller.
- Unplug the vacuum.
- Flip it over and use scissors to cut hair and string from the visible parts of the roller.
- Use a brush to sweep out loose dust.
- Wipe with a dry cloth.
This method won’t reach hidden debris but can help between deep cleans.
Common Problems And How To Fix Them
Sometimes, cleaning the roller reveals other issues. Here’s what to watch for:
Roller Won’t Spin
- Check for hair or debris in the end caps.
- Make sure the roller is seated correctly.
- If the belt is loose or broken, it may need replacement.
Roller Makes Noise
- Remove and clean the bearings.
- Check for broken bristles or warped plastic.
- If noise continues, consult a technician.
Roller Smells Bad
- Wash with soapy water and let dry fully.
- Sprinkle a little baking soda on the roller before vacuuming to absorb odors.
Key fact: Most roller problems come from missed hair in the end caps or bearings—don’t forget to check these areas!
:max_bytes(150000):strip_icc()/how-to-clean-shark-vacuum-filter-5217133-02-e8c7358436354d88801dd61f2273fa40.jpg)
Credit: www.thespruce.com
Keeping Your Roller Clean Longer
Preventing heavy buildup saves you time. Here’s how:
- Pick up large debris (like string, paper clips) before vacuuming.
- Use a rubber broom or lint roller on carpets first if you have pets.
- Empty the dust cup after each use—overflow can push dirt back onto the roller.
- Store the vacuum in a dry place to prevent mold growth.
Signs It’s Time To Replace The Roller
Even with good cleaning, rollers wear out. Look for these signs:
- Missing or damaged bristles
- Roller won’t spin even after cleaning
- Deep cracks or warping
- Persistent bad smell after washing
Shark sells replacement rollers for most models. Using a worn roller can damage your vacuum’s motor.
Comparing Cleaning Frequency: Pet Owners Vs. Non-pet Owners
Pet hair is the number one cause of roller jams. Here’s a quick comparison:
| Household Type | Recommended Cleaning Interval | Common Issues |
|---|---|---|
| With pets | Every 2-4 weeks | Hair tangles, odor, dander buildup |
| No pets | Every 1-3 months | Dust, string, carpet fibers |
Practical insight: If you notice a dip in suction or noisy operation, clean the roller even if your schedule says it’s not yet time.
Cleaning The Roller In Shark Cordless And Handheld Models
Compact Shark vacuums are popular in small homes and for car cleaning. These have smaller rollers but gather hair just as quickly.
- Remove the battery before cleaning.
- Most handheld models have a quick-release roller—press the latch to pop it out.
- Clean and dry as with full-size models.
- Make sure all parts are dry before reinstalling the battery.
Tip: Cordless vacuums are more sensitive to moisture. Use as little water as possible.
How To Clean Self-cleaning Shark Rollers
Some advanced Shark vacuums (like the Zero-M line) advertise a self-cleaning roller. While these are great for minimizing hair wraps, they’re not maintenance-free.
- Unplug the vacuum.
- Remove the roller cover as usual.
- Check for buildup at the ends—self-cleaning rollers can still jam here.
- Clean and dry before reassembly.
Non-obvious insight: Self-cleaning rollers have a comb that removes hair as the roller spins. If the comb gets dirty, clean it gently with a brush.
Advanced: Removing Stubborn Debris And Stains
Sometimes, sticky messes (like gum or glue) get caught on the roller.
- Use a damp cloth with rubbing alcohol to gently rub away sticky residue.
- For hardened debris, scrape gently with a plastic tool—never use metal, which can damage the roller.
- Avoid harsh chemicals like bleach.
What If Your Roller Is Still Not Clean?
If after all these steps your roller still looks dirty, consider these options:
- Soak only the bristle part in warm, soapy water (never submerge the whole roller).
- Replace the roller if it’s beyond cleaning.
- Consult Shark customer service for hard-to-clean models.
How To Reassemble Shark Vacuum After Roller Cleaning
Putting your vacuum back together is as important as cleaning.
- Double-check that all parts are dry.
- Reinstall the roller, aligning it with the slots.
- Replace any washers, bearings, or end caps.
- Secure the roller cover—listen for a “click” or tighten screws firmly.
- Test the vacuum on a small area before full use.
Pro tip: Keep your vacuum’s manual handy for diagrams during reassembly.
Mistakes To Avoid When Cleaning A Shark Vacuum Roller
Many beginners damage their vacuum with these common errors:
- Not unplugging before cleaning
- Using too much water or soaking the roller
- Losing small parts like screws or bearings
- Forcing the roller back into place
- Skipping the end caps and bearings
Always work slowly and check your progress at each step.
Routine Maintenance Checklist
Here’s a quick checklist you can follow each time:
- Unplug vacuum
- Remove roller cover
- Take out roller
- Cut hair and remove debris
- Clean roller and housing with brush/cloth
- Dry all parts fully
- Lubricate bearings if needed
- Reassemble and test
Regular attention means fewer problems and a longer-lasting vacuum.
When To Seek Professional Help
If your roller is still jammed, noisy, or broken after a thorough cleaning, it may be time for a repair. Signs you need expert help include:
- Roller doesn’t spin even with no visible debris
- Motor overheats or shuts off
- Electrical smells or smoke
Contact Shark’s customer support or a certified repair shop for serious issues.
Additional Tips For Shark Vacuum Owners
- Read your manual—every model is different, and shortcuts can cause damage.
- Keep a toolkit (screwdriver, brush, cloth) near your cleaning supplies.
- Replace the roller every 1-2 years for best performance.
- Register your product with Shark for faster support and warranty claims.
- Store your vacuum with the roller off the floor—this prevents bristle flattening.
Expert insight: Taking a few photos with your phone as you disassemble the vacuum can make reassembly much easier.
Environmental Impact Of Roller Maintenance
Keeping your roller clean helps your vacuum last longer, reducing electronic waste. A well-maintained vacuum uses less energy and avoids early replacement.
If you replace your roller, recycle the old one if possible. Many cities have electronic waste programs that accept small vacuum parts.
Comparing Shark Rollers To Other Brands
While all vacuums need roller cleaning, Shark’s design is popular because:
- Rollers are easier to remove than some brands
- Many models have self-cleaning features
- Replacement parts are widely available
For comparison, some other brands require full disassembly to access the roller, or use non-removable rollers that can’t be cleaned as deeply.
Real-world Example: Cleaning A Shark Navigator Roller
Let’s walk through a real cleaning process for a popular model:
- Unplug the Shark Navigator and flip it over.
- Press the two tabs to release the roller cover.
- Gently pull out the roller.
- Use scissors to cut away pet hair wrapped around the brush.
- Wipe the roller with a damp cloth and let it dry for an hour.
- Clean out the roller housing with a brush.
- Reinstall roller and cover.
- Plug in and test—suction is restored, and the roller spins smoothly.
This simple process takes about 20 minutes and keeps your vacuum working like new.
The Cost Of Neglecting Roller Cleaning
Ignoring your roller can lead to:
- Overheating motor ($50–$150 repair cost)
- Broken belt or roller ($15–$30 for parts)
- Poor cleaning (dust and allergens left behind)
A few minutes of maintenance can prevent these expensive problems.

Credit: www.youtube.com
How A Clean Roller Improves Indoor Air Quality
Vacuum rollers pick up not just dirt, but also dust mites, pollen, and pet dander. When the roller is dirty, these can get blown back into your home.
By keeping the roller clean, you:
- Trap more allergens in the vacuum
- Reduce sneezing and asthma symptoms
- Keep your home fresher
Cleaning For Allergy Sufferers: Extra Steps
If someone in your home has allergies:
- Wear a mask and gloves during cleaning.
- Clean rollers outdoors to avoid spreading dust inside.
- Wash hands thoroughly after handling vacuum parts.
Non-obvious insight: Replace your vacuum’s filter regularly—dirty rollers can clog the filter faster.
Storing Your Shark Vacuum For Best Roller Care
After cleaning, store the vacuum upright and off the carpet if possible. For long-term storage:
- Remove the roller and store it separately.
- Keep the vacuum in a dry, cool place.
- Check the roller for buildup before next use.
Using Accessories To Minimize Roller Buildup
Shark vacuums often come with extra tools:
- Pet hair tool—use this for sofas and beds to keep roller cleaner
- Crevice tool—removes debris from hard-to-reach areas
- Hard floor attachment—prevents sticky messes from reaching the main roller
Switching tools for special tasks keeps the roller from collecting heavy debris.
How To Clean Multiple Rollers (duoclean Models)
Some Shark vacuums have two rollers. Clean each one separately:
- Remove both rollers as described in your manual.
- Clean, dry, and inspect each for damage.
- Replace both rollers fully before running the vacuum.
Tip: Mark which roller goes where if they are different sizes.
Diy Vs. Professional Cleaning: When To Choose Each
DIY cleaning is easy and saves money, but if your vacuum is under warranty or you’re unsure, a professional cleaning may be best.
- DIY: Routine cleaning, hair removal, minor jams
- Professional: Motor issues, electrical problems, full tune-up
Professional cleaning costs $50–$100, but can restore an older vacuum.
How To Tell If Your Roller Is Self-cleaning
Look for these signs:
- Model name includes “Zero-M” or “Self-Cleaning”
- There’s a comb or brush above the roller
- Manual mentions automatic hair removal
Even self-cleaning rollers need manual cleaning for heavy pet hair or large debris.
Helpful Maintenance Schedule For Shark Vacuum Rollers
Setting reminders helps you stay on track. Here’s a suggested schedule:
- Every 2 weeks (pet owners): Quick check, remove hair
- Every month: Deep clean, including bearings and end caps
- Every 6 months: Inspect for damage, replace if needed
Set a phone reminder or add this to your cleaning calendar.
Expert Tips For Maximum Roller Lifespan
- Avoid vacuuming wet debris—moisture damages the roller and bearings.
- Run the vacuum over entry mats to pick up grit before carpets.
- Don’t leave the vacuum running on one spot—this can melt bristles.
Where To Find Replacement Rollers
Genuine Shark rollers are available from:
- Shark’s official website
- Major online retailers (Amazon, Walmart)
- Local vacuum repair shops
Avoid generic rollers unless well-reviewed—some don’t fit or last as long.
Cleaning Other Parts While You’re At It
While cleaning the roller, it’s smart to:
- Empty and rinse the dust cup
- Wash or replace the filter
- Wipe the vacuum’s exterior
A clean machine works better and lasts longer.
How To Clean A Shark Vacuum Roller: Summary
Cleaning your Shark vacuum roller isn’t just a chore—it’s a key part of caring for your home. Regular maintenance means your vacuum will pick up more dirt, last longer, and help keep your air cleaner. With the right tools, a careful approach, and a few expert tips, you’ll have a Shark vacuum that runs like new for years.
For more detailed diagrams and model-specific guidance, check out the Shark official cleaning tips page.
Frequently Asked Questions
How Often Should I Clean My Shark Vacuum Roller?
If you have pets or long hair, clean the roller every 2–4 weeks. For homes without pets, every 1–3 months is enough. Clean sooner if you notice loss of suction or noise.
Can I Wash The Roller With Water?
You can use a damp cloth and mild soap for most rollers, but never soak the roller or get the bearing area wet. For soft rollers, follow the manual—some can be rinsed, but always dry fully before reassembling.
What If The Roller Still Won’t Spin After Cleaning?
Check for hair or debris in the end caps and bearings. Make sure the roller is seated correctly. If the problem continues, the belt might be broken or the motor could need repair.
Is It Safe To Use Oil To Lubricate The Roller?
Only use a small amount of food-grade or vacuum-specific lubricant on the bearings if they squeak. Never use WD-40 or cooking oil, as these attract dust and can damage parts.
Do All Shark Vacuums Have Removable Rollers?
Most modern Shark vacuums have removable rollers, but some older or handheld models may be different. Always check your manual before trying to remove the roller.
Keeping your Shark vacuum roller clean is a simple task that pays off with better cleaning, fresher air, and a longer-lasting machine. Make it a habit, and you’ll notice the difference every time you vacuum.